Monday, June 23, 2014

Fermented Ketchup

I have review many fermented Ketchup recipes and I think this is the one I want to try.  I found it on The Domestic Man at http://thedomesticman.com/2014/03/25/paleo-homemade-fermented-ketchup/


My recipe still maintains the sweet and sour taste we’ve all come to expect from ketchup, but throws a historical twist in for good measure: a bit of fish sauce.

Homemade, Fermented Ketchup

  • Servings: 2 cups
  • Time: 10 mins plus 2-5 days
  • Difficulty: Easy
  • Print
1/3 cup hot water
1/3 cup honey
2 6oz cans tomato paste
2 tbsp whey (the clear liquid at top of yogurt) or sauerkraut juice
1 tbsp apple cider vinegar
1 tbsp fish sauce
1 dash (1/8 tsp) cinnamon
1 dash (1/8 tsp) ground cloves
1 dash (1/8 tsp) garlic powder
1 dash (1/8 tsp) black pepper
1 dash (1/8 tsp) sea salt, more to taste

1. Combine the hot water and honey, stirring until dissolved, then set aside to cool.
2. Combine the honey water and the rest of the ingredients. Add salt to taste.
3. Place in a quart-sized jar, cover, and let set at room temperature until fizzy and delicious. It should take 2-5 days. After the second day, be sure to burp the lid daily to prevent gas buildup. Taste it every day after the second day to see how you like it; once it tastes perfect, throw it in the fridge. It should keep for about 1 month.

** This recipe creates a fairly thick ketchup – to thin it, simply mix in a bit of water to get your desired consistency.
** If you don’t have access to whey or sauerkraut juice, add 1 tbsp water and 1 additional tbsp of apple cider vinegar.
** The slightly fishy taste of this sauce is awesome, but if you’d like to omit the fish sauce altogether, replace it with 1 additional tbsp of apple cider vinegar.
** This ketchup can also be made without fermentation. It’ll be a bit sweeter and won’t have that awesome fizz to it. To make it, simply combine all of the ingredients and simmer on low for about 20 minutes, then cool and bottle. It will only last about 1 week in the fridge.

Sauerkraut

Found on Simple Life Mom http://simplelifemom.com/2014/03/05/homemade-sauerkraut/
Update on 2/4/15 I am making some modifications on this based on http://wholenewmom.com/recipes/easy-homemade-sauerkraut-recipe/

I have been reviewing many Sauerkraut recipes in the hopes of making this.  I think I just need to do it.

Homemade Sauerkraut is a wonderful way to receive good nutrients from lacto-fermentation.  Lacto-Fermentation is a food preservation process that has been used for thousands of years.  There are many great reasons to eat fermented foods.  The chief reason is to provide healthy bacteria for your gut.  We wipe out our good flora with antibiotics and chlorinated water.  This is one way to help replenish our system.

Homemade Sauerkraut


  • cabbage
  • salt (without iodine or anti-caking additives)
  • caraway seeds (optional)
  • bay leaves (optional)
Instructions
  1. Chop or shred cabbage.
  2. For every pound of cabbage mix 2t of finely ground salt.
  3. Toss cabbagge and salt with hands and let rest for ~1hr. <OR> Pound with a pestle or potato masher until cabbage is softened and begins to release its juices (usually about 10 minutes).
  4. Add 1t. caraway seed/lb and/or 1 bay leaf/lb
  5. Pack tightly into a jar
  6. Once in jar cover with cabbage leaf and weigh down.  If cabbage is not completely submerged by liquid then add 1-1/2t salt to 1c water and pour on top to submerge
  7. Let ferment on your counter top (during winter) or a room around 70F for 5 days  Most recommend 4-6 week.  4 weeks is needed for a full cycle of probiotics to develop.
  8. I then move my sauerkraut and liquid into jars, seal, and put in the refrigerator or basement. 
Place cabbage in a container with its juices.  Add water and/or whey (if needed) until cabbage is completely submerged.   You will need to use a lid that is smaller than the top of the container so that you can weigh it down.  You can also use a plate. It is very important that the cabbage does not touch the surface so that no yeast and bad bacteria will grow.  I used a smaller lid weighted down by a glass container filled with water.  Cover with a cloth or plastic wrap with a few holes poked in it to release fermenting gasses.  See picture below:
Homemade SauerkrautLet ferment on your counter top (during winter) or a room around 70F for 5 days (More if desired. Some let it ferment for 4 weeks or more).  I then move my sauerkraut and liquid into jars, seal, and put in the refrigerator or basement.  Use within 4-6 weeks.
 

Variations:  Add shredded carrots, carroway seeds, and/or shredded apple.
Troubleshooting:
  • White Substance: If a white substance is found in your water, simply skim it off the top.  This is common when the cabbage touches the surface.  It is kahm yeast.
  • Colorful Mold: it’s dangerous.  Throw it all out.
  • Slimy: too much growing in it because of not enough salt.  Discard.
  • Soft and Mushy: Often, this is caused by too much heat.

Wednesday, June 18, 2014

Grocery Bag Messenger Bag

I found this on Crochet Dynamite http://www.crochetdynamite.com/2013/01/fused-plastic-messenger-bag_18.html

Fused Plastic Messenger Bag

I made a fused plastic and nylon yarn messenger bag last summer to carry all of my stuff at a craft fair.  It was really fun to make, but there were some design problems with it.  Fused plastic is really lightweight. Nylon yarn is deceptively heavy. If you machine sew fused plastic with a straight stitch, you create a perforated seam that tears out fairly easily when pulled on.  Nylon embellishments will pull on any edge they're attached to.  And one day at the craft fair was enough for the sides of that bag to become compromised.  That is a TERRIBLE feature in a lovingly handcrafted bag. 
So I've improved it!  This version is never going to fall apart on you.  You'll have to take a pair of scissors to it to get it to tear.  I've made it convertible, so you can carry it as a messenger bag, or a shoulder bag.  It is not as fancy as the other version, but I will tell you how you can add decorative elements to make it as fancy as you like.  For now, though, I'm going to show you how I made the basic bag.
Fused Plastic Convertible Messenger Bag
approximately 14" wide by 12" high
Supplies:
3 sheets of fused plastic (9 plastic grocery bags)
approximately 40 yards of plarn (5 plastic grocery bags)
Size N crochet hook
2 large dog leash clips (I found them in the purse-making section of my local craft store)
14" non-separating sport zipper
Wonder Clips (by Clover.  They're optional, but you can't use straight pins to hold the fused plastic together because it makes holes that can't be repaired.  The Wonder Clips hold the pieces together without making holes.  If you think you're going to do a lot of work with plastic, they are well worth the purchase)
Sewing machine and thread 
Scissors
Side Tab
(make 2)
Using the plarn and N hook, ch 11
R1: sc in 2nd ch from hook, sc in each ch across (10 st)
R2-3: ch 1, sc in each st across (10 st)
Don't fasten off.


Slide one of the dog leash clips onto the strip, and fold strip in half, matching the short ends.  Crochet the ends together, using 4 sc stitches.  Fasten off.  Don't weave in the ends.  Tie the starting and finishing ends together in a knot.   Trim the ends if desired.


Strap
ch 76
R1: sc in 2nd ch from hook, sc in each ch across (75 st)
R2: ch 1, sc in each st across (75)
Fasten off.

Making the bag
Cut two of the fused plastic sheets to make two 15" x 13" rectangles.  These will be the main body of your bag.  The 15" sides will be the top and bottom.  Determine how you'd like your bag to look by experimenting with which side of the fused plastic (more ink showing through, or less ink showing) and which direction you'd like the writing/logos to be facing.

Take the piece that you'd like to use as the front of your bag.  Line the zipper up with the top edge, making sure that the plastic sheet overlaps the fabric side of the zipper.  Clip the zipper in place.  Sew the zipper to the top edge of the plastic sheet, using a wide zig-zag stitch.

Repeat on the other side of the zipper to attach the back of the bag. You may to unzip the zipper so that you can clip it in place along the center section of the zipper.


Cut a 13" x 10" rectangle out of the last piece of fused plastic.  *All of the scraps can be recycled anywhere that you recycle plastic bags*

This piece will become the front flap of the bag, so it's is a perfect opportunity for you to use a piece of fused plastic that you really like the logo on, or one that you've added words to.


Clip the front flap to the back of the bag, approximately 1" below the zipper.  Sew in place, using a wide zig-zag stitch.


Now it's time to put the bag together!  Grab your side tabs and Wonder Clips!


Fold the bag together, right sides facing.  Clip the sides together, matching the lower corners (because we're working with fused plastic, and not fabric, this may be challenging, even if the rectangles were exactly the same size to begin with.  Adding the zipper may have thrown things off a little).

Sandwich the side tabs in between the two layers of plastic, making sure that the clip end is in and the crocheted end sticks out slightly.  Place it as near the top of the bag as possible, right up next to the zipper.  Open up the zipper at least half way across the bag, so that you will eventually be able to turn the bag right side out again. :D


Using a wide zig-zag stitch, sew all the way around the bag. Be very, very careful not to catch the front flap in your seam!

While it is still wrong sides out, flatten the lower corners into triangles.  Make a mark across the triangles where it measures 2" across.


This is the only time it's okay to use a straight stitch on this bag: sew across the mark you just made. Snip the excess plastic off to neaten the edge.
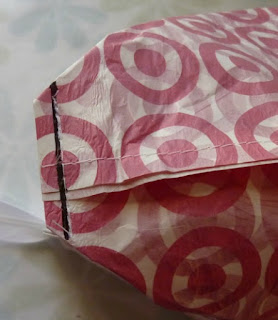

Now you can turn it right side out!  If you caught the front flap in one of your seams, carefully cut it away from the seam, and it should still look all right.  You can now attach the strap to the side flaps, by clipping through the stitches at the end of the strap.  This makes it incredibly adjustable!

Full Length strap
Or, if you'd like to use your bag as a shoulder bag, you can clip both ends into one clip, and then loop the center of the strap through the other clip.  Convertible awesomeness!!

You may want to round the corners of your front flap at this point, like I did.  You can use the edge of a plate to help make that curve perfect, or you can just wing it.  It's completely up to you.  If you would like to add a crochet edge to the front flap, I would highly recommend using the technique I used in THIS post to add the crocheted flap.  I would also suggest that if you'd like to add crochet embellishments, like flowers, to the front flap, don't sew them on.  Put a pin on the back and use that to attach them.  Yes, it will make small holes, but you will be able to see right away if they're going to catch on things as you go about your day (and those tiny holes can be patched by fusing on another piece of plastic over the top).

Fusing Grocery Bags

In my fear in that when I have time to try a new project and I try to google it and it isn't there or I can't find it.. I am now putting it here.

This is from Crochet Dynamite http://www.crochetdynamite.com/2013/01/fusing-plastic-bags.html and it is referenced in my link http://kkezir02.blogspot.com/2014/06/grocery-bag-purse.html

Fusing Plastic Bags

So first off, before we get going, I'd like to thank you for joining me for Recycling with Crochet Week!  I have become so inspired by this project, and all of the possibilities, that I'm sure I'm going to incorporate more recycled elements into my future projects as well!

This first project is one that is near and dear to my heart.  My love of fusing plastic shopping bags (also sometimes called laminating) began in 2007 when I saw a market bag made out of it in CRAFT magazine.  It was love at first sight!  Of course, I had to find out everything that I possibly could about how to do it.  It was like a crafty dream come true: Take materials that come free-with-any-purchase (plastic bags),  melt them together, and you get a waterproof 'fabric' that you can make literally anything out of!  Wallets? Yes!  Bags? Yes!  Raincoat? Heck yes!

Over the years I've developed my own techniques to making fused plastic.  I've probably made a hundred bags using this technique.  The bags made from the fused plastic are sturdy and amazing.  Basically we're going to be making a homemade version of Tyvek, that super strong, super thin plastic that can be sewn like fabric.

There are only a few things that we need to get started:
An iron and ironing board
Parchment paper (it's in the baking section of the market next to the aluminum foil and wax paper)
Scissors
As many plastic shopping bags as you possibly can get your hands on (seriously, this is the project for all of the split bags, holey bags, damaged bags that you've got in the recycle pile.  You can clean the really dirty bags that have food/sticky grossness on them and use them too!)


First, we need to prep the bags to get them ready for fusing.   Straighten them out so that they're smooth.  You're going to cut the handles off, and the seam at the very bottom of the bag.

**Don't throw away the bag handles and bottom seams.  You can still recycle them like a normal plastic bag.  Just keep a dedicated "Recycle" plastic bag that you can throw all your scraps into.  When it's full, take it back to the grocery store (or recycling center, Target, or anywhere else that takes plastic bags for recycling).**


This will leave you with a rectangle of plastic.  Neat, huh?  Now do it again!  And again!  Like, 15 more times!  You're going to have a giant stack of bags!


So, the ink that they use on plastic bags doesn't always fuse nicely, which is why I turn the bags inside out before I fuse them.  Open up the rectangle you just cut into a big plastic tube, and turn the bag inside out.  Smooth it out so that it's flat and straight.


Now turn the next one inside out.  But before you smooth it, open up the bottom edge of the first bag and tuck the 2nd bag inside the first bag.


Now smooth them both out, so that they're lined up and even.  Now turn a 3rd bag, and tuck it inside the 2nd bag.


This gives us 6 individual layers of plastic per each sheet of fused plastic.  You can set the stack of three bags aside and make a bunch more right now, or you can start fusing.  Yeah, I'm going to start fusing now too!

**A caution before we start:  Always fuse plastic with plenty of good ventilation, preferably near an open window.**

Heat up your iron to the polyester setting (once you get going, if your bags don't seem to be fusing, you can nudge that up to almost the cotton setting.  Any setting beyond that will make holes in your plastic)


Place a sheet of parchment paper longer than the plastic bags on the ironing board.


Put your stack of bags down on top of the parchment.


Place a second sheet of parchment paper over the top of the stack of bags.  Make sure that the parchment completely covers the part you're going to iron so that none of the plastic comes in direct contact with the iron.

Now you can iron the bags together!  Iron from the center of the bags towards the edges, using slow, smooth motions.  Don't spend more than a few seconds in any one spot.  This helps to push the air that's trapped between the layers of plastic out to the edges where it can be free to NOT turn into a giant bubble in the middle of your sheet of plastic.

This is something that may take a while to get the feel for.  If the iron is too hot, the plastic will melt too quickly and you'll get a hole.  If you don't move the iron quickly enough, the plastic will melt and you'll get a hole.  If you move the iron too quickly, the plastic won't fuse.  If the iron isn't hot enough, the plastic won't fuse.  It's like the first pancake.  The first one might not turn out very good, but it will teach you a LOT.  You'll get the hang of it.


Pretty soon you'll start turning out sheet after sheet of perfectly fused plastic, which is good, because we're going to need lots of them!

You can get really creative with the lettering on the bags too, once you've got the hang of fusing.  You can cut out the letters from the bags and use them to create your own personalized plastic sheets!  Lay the cut letters on top of the bags that are going to be fused, and place a plain bag with no lettering over the top of them (to be sure that they show through!).  Fuse the plastic the way you normally would.  Voila!


This fusing technique also works with other types of plastic too.  I fused a plastic tablecloth that we had used at 3 different parties and was no longer suitable for partying (how do they get those holes during a buffet?).  I folded it in quarters, so that there were 8 layers of plastic (it seemed thinner than the plastic bags).  It turned out really cool!

So now that you've got all the lovely sheets of fused plastic, we can turn them into something awesome!  I've got several projects, but in the spirit of trying to keep my posts from getting too huge I'm going to put them up in a different post!  Or, actually, it's several different posts... :D

See the Fused Plastic Purse HERE
See the Fused Plastic Baby Bib HERE
See the Fused Plastic Messenger Bag on 1/18/13

Grocery Bag Purse

Found this on Crochet Dynamite http://www.crochetdynamite.com/2013/01/fused-plastic-purse.html

It looked like a fun project.  I think I would make it an over the shoulder back and I don't know if I would use crochet for the handles.  I also don't know if I would use a worsted weight yarn for crochet the top.


Fused Plastic Purse
Approximately 8" high x 11" wide
Supplies:
1 sheet of fused plastic  or at my link http://kkezir02.blogspot.com/2014/06/fusing-grocery-bags.html
14" zipper
Wonder Clips (by Clover.  Pins will make holes in the plastic, so you need to use clips to keep the plastic from slipping while you sew it.)
1/8" hole punch (this is half the size of a normal hole punch, I bought my for $5 in the scrapbooking section of the craft store)
Small amount of worsted weight yarn (I used Red Heart Soft in Turquoise)
Size G crochet hook
Scissors
Yarn needle
Sewing machine
Fancy button (I used a bottle cap that I recycled into a button by punching 2 holes in it, but you can use any button that makes you happy!)


Cut your sheet of fused plastic into two 9" x 12" rectangles (any leftover fused plastic scraps can be recycled).  Clip one of the sheets to the zipper along the 12" side.  Using a zig-zag stitch, sew the plastic to the zipper, leaving a 1/4 edge that will kind of cover over the teeth of the zipper.


Repeat with the other sheet of plastic on the other side, making sure that you line up the sheets before you sew it down.


Now that you've got the zipper in the middle of the two sheets of plastic, fold them with the right sides together and clip them together.


Make sure that you open the zipper up at least a fingers width so that you'll be able to get your bag open once you get it sewn.


Sew down one side, across the bottom, and up the other side.


Open the zipper up, and use your hand to fold the corner the other way to make it a triangle with the seam in the middle.  Clip the triangle together on each side to hold it in place.  Repeat on the other side.


Make a mark across the triangle at the place where the triangle is 1 1/2" across on both sides.


Using a straight stitch, sew along that line. Repeat oh the other side.


Cut off the excess triangle tips, leaving a 1/4" edge.


Turn the bag right side out.  Use your fingers to poke the corners out of the bottom to make them sharp.  Zip and unzip your cool new bag.  Take a picture of it to share on Facebook with the caption, Look at what I just did!!!


Okay, now that you've had a little break, use the hole punch to make 43 evenly spaced holes along the back edge of the little flap you left when you sewed in the zipper.


Bag Flap:
R1: Attach yarn to the first hole in the row and put one sc in each hole across the back of the flap (43 st)
R2-11: ch 1, sc in each st across (43 st)
Fasten off.  Weave in ends.


Bag Handles:
(make 2)
ch 51
R1: sc in 2nd ch from hook, sc in each ch across (50 st)
R2-6: ch 1, sc in each st across (50 st)
R7: ch 1, sl st in the next 15 stitches, sl st the next 20 stitches to the center 20 stitches of the foundation chain, sl st in the last 15 stitches.
Fasten off.  Weave in ends.


To Sew the Bag Handles onto the bag:
Measure 2" down from the top edge of the bag, and 2" in from the side seams.  This is where the outside corner of your bag handle is going to go.


Clip it in place with a Wonder Clip.  Clip the other side in place.  Using your sewing machine, sew the bag handles onto the bag (I like to use a small rectangle pattern to sew on the handles).


Using worsted weight yarn, sew the button onto the front center of the bag, approximately 4" from the top edge of the bag.


Button Loop:
R1: Attach yarn 21 stitches in from the end of the Bag Flap.  Chain approximately 27 stitches (adjust number of chains to fit around your button), skip 1 stitch, and attach chain to the next stitch.  (27 st)
R2: sc in each ch around loop (27 st)
Fasten off, leaving a 10" tail.  Use your yarn needle to stitch top 5 stitches on the right side to the top 5 stitches on the left side of the button loop.  (Use picture as a guide)

 You can check out more Fused Plastic projects at the bottom of THIS post!

Crochet Tshirt Rug

Crochet T-Shirt Rug
This is a post that I found on One Dog Woof. http://www.1dogwoof.com/2012/08/crochet-rug-from-t-shirts.html

I have tried making a rag rug before but never finished it because I ran out of scrap matieral to finish it.  I was using old bed sheets and material scraps and I didn't want to go buy more material.

But I thought this would be a great way to use the scraps when you get done with a t-shirt quilt.

I want to do this in a oval or a rectangle.  I also think this would be a great Christmas gift for the girls.
Repurposed T-shirt Rug

Step 1.  Acquire fabric.  In this case, I used XXL men’s t-shirts from Goodwill.  Choose t-shirts that are mostly or 100% cotton, and have no or very little print on them, preferably, only above the arm line.  You’ll also want the fabric weight to be fairly consistent

Step 2. Create your yarn.  There are oodles of t-shirt yarn tutorials out on the internet.  Feel free to choose any one of them, or try this one on for size.  Cut the shirt below the arm line and below any print (hence the no or little print rule).  Fold the t-shirt from one side to the other side but leave it about 1 inch short from actually meeting ends – this is your 1 inch allowance.  Now cut the t-shirt into 1.5 inch strips, avoiding the 1 inch allowance.  Thicker strips will give you thicker yarn.  Thinner strips give you thinner yarn.  Don’t cut too thin, or the yarn won’t form.  Open up the shirt to see your 1 inch allowance.  Cut starting from the hem, on a slant, from 1 strip to the next across the allowance – this connects all the strips together.

The basic idea is that the shirt is already in the round, so you’re cutting a continuous strip from the bottom hem up to the armpit.  Actually, remove the hem before cutting – it doesn’t curl well (or, at all).  Once you have the big strip, stretch the strip and allow the knit in the t-shirt to curl in on itself, thus creating the yarn.
Repurposed Rug Using T-shirt Yarn

Step 3. Ball up your yarn.  This is actually pretty important, but once I started to crochet, I realized I twisted the yarn as I balled it, so there was a lot of tension.  I ended up unraveling the whole darn thing before crocheting, which kind of defeats the purpose of balling it up in the first place.
Crochet Rug using Repurposed T-shirts

Step 4. Crochet.  I used a single crochet here for a dense weave.  You’ll be crocheting in the round, so start either with a magic circle or the Chain 2 method.  Both are described in this post.  For a quick look at the single crochet, head over to this post, or check out the other crochet tutorials I have!

I used the largest crochet hook I had on hand, which was a size Q and started with 6 SC in the first round, doubled it to 12 in the second round, and slowly increased by multiples of 6 beyond that.  In retrospect, I think I would also try starting with 4, doubling to 8, and then actually counting my way around.

1st round: 6 SC
2nd round: 2 SC in each stitch (12 stitches)
3rd round: *1 SC in next stitch, 2 SC in next stitch, repeat from * (18 stitches)
4th round: * 1 SC in next 2 stitches, 2 SC in next stitch, repeat form * (24 stitches) and so on.


Use Old T-shirts to Crochet a Rug

Or, you can be like me and just make it up as you go, increasing as necessary to keep the piece flat.  If the work is curling up, you need more stitches in the round.  If the work is ruffling, you can either take it apart and not increase as many stitches, or do a round with no increases, sort of to bound the problem.  I also tried to alternate where I made the increases so as to keep a circle shape.  I’ve noticed that if I increase in the same spot each round, I end up with a polygon instead of a circle because of the bulge that extra stitch makes.

When you run out of a particular shirt, tie it to the next shirt with a small knot and keep going.  When you’ve come to your desired size, or to the end of your t-shirt stockpile, pull the end through the last loop and pull tight.  Then weave in your ends.