Showing posts with label baby. Show all posts

Wednesday, October 11, 2017

Itsy Bitsy Spiderweb Baby Blanket

Itsy Bitsy Spiderweb 
From Leisure Arts "Our Best Baby Afghans" (in filing cabinet)

Finished Size: ~34" x 46'

Materials:
- sport weight yarn ~13oz 1255 yards
- hook, size H

Gauge: 16dc and 10 rows = 4"

Ch137 loosely.

Row 1 Dc in fourth ch from hook and in each ch across 135 sts.

Row 2 (Right side) Ch3 (counts as first dc, now and throughout), turn ; dc in next 2 dc, * ch1, skip next dc, dc in next 15 dc* to last 4 dc, ch1, skip next dc, dc in last 3 dc.
Note Loop a short piece of yarn around any stitch to mark last row as right side.

Row 3,14,25,36,47,58,69,80,91,102 Ch3, turn; dc in next 2 dc, ch1, *dc in next dc, (ch1, skip next dc, dc in next dc) 7 times, ch1* across to last 3 dc, dc in last 3 dc.

Row 4,15,26,37,48,59,70,81,92,103 Ch3, turn; dc in next 2 dc, ch1, *dc in next dc, (dc in next ch-1 sp and in next dc) 7 times, ch1* across to last 3 dc, dc in last 3 dc.

Row 5,16,27,38,49,60,71,82,93,104 Ch3, turn; dc in next 2 dc, ch1, *dc in next 15 dc, ch1* across to last 3 dc, dc in last 3 dc

Row 6,17,28,39,50,61,72,83,94,105 Ch3, turn; dc in next 2 dc, ch1, *dc in next 3 dc, ch3, (skip next dc, tr in next dc) 4 times, ch3, skip next dc, dc in next 3 dc, ch1* across to last 3 dc, dc in last 3 dc.

Row 7,18,29,40,51,62,73,84,95,106 Ch3, turn; dc in next 2 dc, ch1, *dc in next 3 dc, ch3, sc in next 4 tr, ch3, dc in next 3 dc, ch1* across to last 3 dc, dc in last 3 dc.

Rows 8-10,19-21,30-32,41-43,52-54,63-65,74-76,85-87,96-98,107-109 Ch3, turn; dc in next 2 dc, ch1. *dc in next 3 dc, ch3, sc in next 4 sc ch3, dc in next 3 dc, ch1* across to last 3 dc, dc in last 3 dc.

Row 11,22,33,44,55,66,77,88,99,110 Ch3, turn; dc in next 2 dc, ch1, * dc in next 3 dc, ch1, (tr in next sc, ch1) 4 times, dc in next 3 dc, ch1* across to last 3 dc, dc in last 3 dc.

Row 12,23,34,45,56,67,78,89,100,111 Ch3, turn; dc in next 2 dc. ch1. * dc in next 3 dc and in next ch-1 sp, (dc in next tr and ch-1 sp) 4 times, dc in next 3 dc, ch1* across to last 3 dc, dc in last 3 dc.

Row 13,24,35,46,57,68,79,90,101,112 Ch3, turn; dc in next 2 dc, ch1, *dc in next 15 dc, ch1* across to last 3 dc, dc in last 3 dc

Rows 14-114 Repeat Rows 3-13, 9 times; then repeat Rows 3 and 4 once more.
Row 115 Ch3, turn; dc in next dc and in each dc and ch-1 sp across, do not finish off.

EDGING
Rnd l Ch1, turn; work 136 sc evenly spaced across; working in end of rows, 3 sc in first row, work 173 sc evenly spaced across to last row, 3 sc in last row working in free loops of beginning ch (Fig, 23b, page 125), work 136 sc, evenly spaced across working in end of rows, 3 sc in first row, work 173 sc evenly spaced across to last row, 3 sc in last row join with slip st to first sc 630 sc.

Rnd 2 Ch1, *sc in next sc, ch4, sc in third ch
from hook, ch2, skip next 2 sc*around; join with slip st to first sc, finish off.


Monday, August 24, 2015

Crochet Soaker Diapers

This is being copied from Fleisher Yarns "Triangle Soakers No. 3481 and Crocheted Soakers No. 3483" Fleisher's Baby Book, Hand Knits for Infants to 4yrs Vol.87 (1950):10, 51. Print.


Triangle Soakers No. 3481

Size: Small and Large Size
Note: Instructions are for smaller size, changes for larger size are in parentheses

Materials
-Fleisher's Petite Knitting Worsted, 1 skein; or Fleisher's Wonderized Casa-Laine Sport Yarn, 1 ball.
-Bucilla Plastic Knitting Needles, 1 pair Size 4

Gauge: 6sts=1"

Cast on 112 (120) sts. Work k1, p1 ribbing for 5 rows.
Beading - right side -*k1, yo, k2 tog., p1: repeat from * to end
Work 7 more rows of ribbing. Change to a garter st (k every row), work 10 (16) rows even.
Dec. row - k1, k2 tog., k to end. Repeat last row until 2 sts remain. k2 tog. Fasten off.

Finishing Off
Steam by laying flat on pressing board, wrong side out.  Steam first one side and when dry, steam on other side. Steam all seams and crochet edges. Do not steam ribbing.

Sew ribbing and even rows of garter st tog. Fold soaker with point meeting end of seam. Sew first 3" each side of point to first 3" below seam matching ridges. With double strand of yarn, ch 30" for cord and run through beading.

Crocheted Soakers No. 3483

Medium size
Materials
-Fleisher's Wonderized Babyfair, 2 balls
-Bucilla Plastic crochet hook, Size 3
Gauage: 6sts=1"  13rows=3"

First Half
Ch38 for lower edge.  Work 1 hdc in 3rd st from hook and in each st to end; 36 sts.
Ch2, turn (ch2 does not count as 1 st), inc. 1st (2hdc in 1st) each side in each of the next 14 rows; 64hdc.
Work 4.5" even.
Dec. 1 st each side in next row. Work 1 row even. Dec. 1 st each side in next row.  Work 2 rows. Ch1 turn, 1sc in each st. Fasten off.

Second Half
Working from same side as row 1 of first half, work 36 hdc on free side of foundation ch. Finish 2nd half to correspond to first half.
Sew side seams. From right side, work a row of sc around leg openings, spacing sts to keep an even edge. Steam by laying flat on pressing board, wrong side out.  Steam first one side and when dry, steam on other side. Steam all seams and crochet edges.

Cord
Make a ch about 32" long, work a slip st in 2nd st from hook and in each st to end. Fasten off. Draw cord through last hdc row on top of soakers


Monday, September 29, 2014

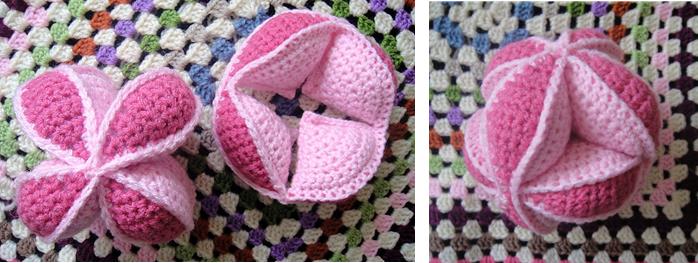
Puzzle Ball Pattern

I found this on "Look at What I Made" http://www.lookatwhatimade.net/crafts/yarn/crochet/free-crochet-patterns/crochet-amish-puzzle-ball/

I thought this was pretty cool.  And would like to make one some time.


Amish Puzzle Ball2 Crochet Amish Puzzle Ball Pattern
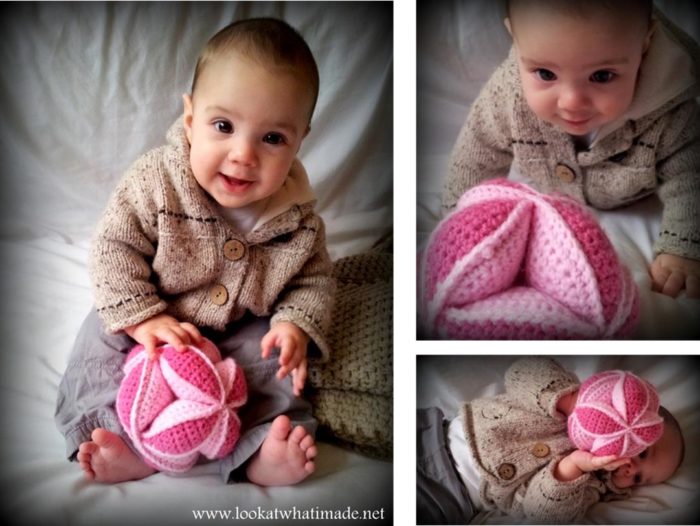
Let me introduce you to my Crochet Amish Puzzle Ball.  I can hype it up and tell you that your kids will have endless hours of fun playing with this puzzle ball, but the truth is that I have a lot more fun with this puzzle ball than my kids do (although they love it).

The minute someone walks into my house I practically force it on them!  And what fun it is watching people try to assemble it.  Of course it only takes them a little while to figure it out, because it IS pretty simple.  But doesn’t it look cute?  And as a ball it kicks some serious crochet ass!
The chunky design means that it is super easy for little hands to grab hold of.  And the million colour possibilities make it a treat for little eyes and inquisitive minds.

Now before we go any further.  If you are at all concerned about the apparent amount of sewing involved, let me put your mind at ease.     All the segments are crocheted together at the end and the tails of yarn are enclosed INSIDE the ball – if you follow my advice, leaving you with 3 tiny tails of yarn to sew away.  That’s right, ladies!  3 itty bitty bouts of sewing.  I think that’s pretty awesome!
Amish Puzzle Ball 8 Crochet Amish Puzzle Ball Pattern 

How does the Crochet Amish Puzzle Ball work?

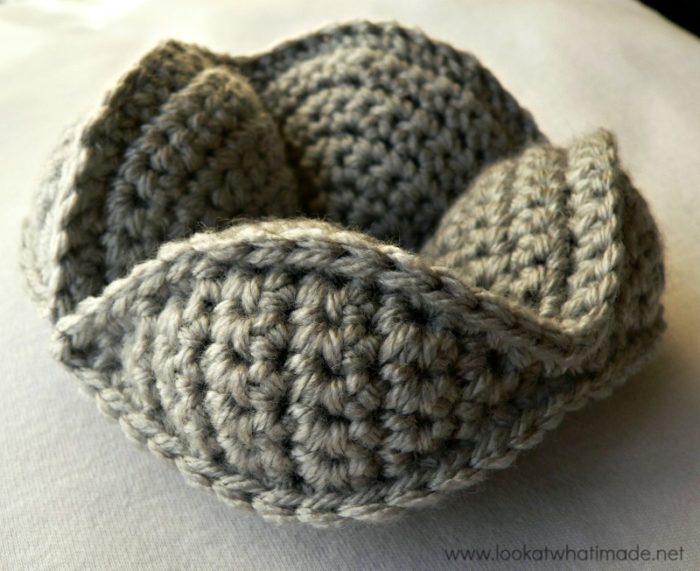
The ball comes apart into three separate “rings/segments” (each containing four wedges) which then have to be re-assembled to form the ball.

Be warned that this is one of those mind-numbing projects.


You will need to make 12 of the same thing.  So I would advise resigning this particular project to evening tv time (if you indulge) and car trips.


(Update 3/3/13:  It takes me about 3 lazy hours to make a Crochet Amish Puzzle Ball from scratch, but I have made a few!!)


Crochet Amish Puzzle Ball Pattern

Dedri Uys ©2011.  All Rights Reserved.
This pattern is not currently available as a PDF.  I am in the process of updating my older pattern PDF’s.

Size

  • If you prefer to use double knit yarn and a 4 mm hook, the ball will be roughly 13 cm in diameter. That is about 5”.
  • If you use worsted weight yarn and a 4 mm hook, the ball will be about 15 cm in diameter. That is about 6”.

Materials

Update:  I have recently started working with worsted weight yarn and much prefer the denser structure obtained when using worsted weight yarn.  The ball below is made with the materials listed below, but I suggest you use worsted weight yarn instead of double knit!  If you do use worsted weight, you will need about 220 meters.
  • 4 mm Crochet hook (US G/6  UK 8)
  • Double knit yarn (light worsted weight/#3) in contrasting colours –  about 120 m for the wedges, 45 m for the lids and 30 m for crocheting the lids to the wedges.
  • OR Worsted weight yarn (Aran/#4) in contrasting colours – about 140 m for the wedges, 55 m for the lids and 35 m for crocheting the lids to the wedges
  • A yarn needle for working away your tails of yarn
  • About twice as much stuffing as you think you will need

Abbreviations

US Terminology used
{You can see a US/UK comparison chart for hooks and terminology here.}
ChChain
Sl stSlip stitch
ScSingle crochet
Sc incSingle crochet increase
St/st’sStitch/stitches


Additional Notes

The initial ch st’s in each row/round are NOT counted as stitches.

Instructions

Crochet Amish Puzzle Ball Wedges Crochet Amish Puzzle Ball Pattern

Wedges

(Make 12)
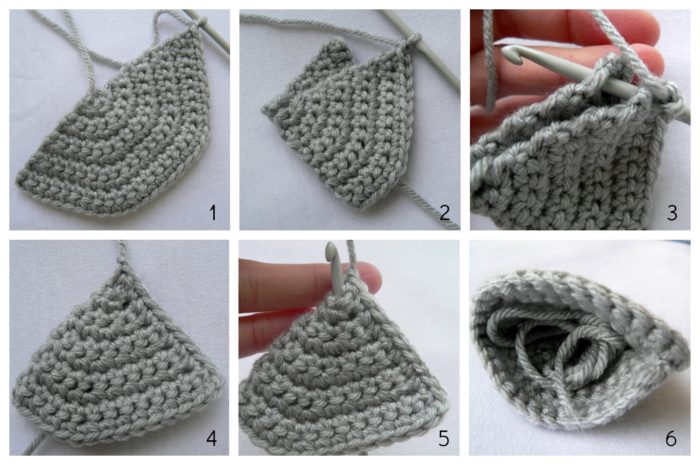
These wedges are worked in rows and joined with a seam.  If you would rather make seamless (spiral) wedges, see the instructions for the Star Ball.Ch 2.  Make 3 sc’s in the second ch from the hook.  Ch 1 and turn. (3)
  1. Sc inc in each st.  Ch 1 and turn.  (6)
  2. (Sc inc in the next st, sc in the next st) 3 times.  Ch 1 and turn.  (9)
  3. (Sc inc in the next st, sc in the next 2 st’s) 3 times.  Ch 1 and turn.  (12)
  4. (Sc inc in the next st, sc in the next 3 st’s) 3 times.  Ch 1 and turn.  (15)
  5. (Sc inc in the next st, sc in the next 4 st’s) 3 times.  Ch 1 and turn.  (18)
  6. (Sc inc in the next st, sc in the next 5 st’s) 3 times.  Ch 1 and turn.  (21)
  7. (Sc inc in the next st, sc in the next 6 st’s) 3 times.  Ch 1 and turn.  (24)
  8. (Sc inc in the next st, sc in the next 7 st’s) 3 times.  Ch 1 and turn.  (27)
  9. (Sc inc in the next st, sc in the next 8 st’s) 3 times.  Ch 1. Do not turn.  (30)
Fold the half-circle in half so that the end containing the hook is closest to you (Photo 2).  Insert your hook into the first row down the side of the resulting wedge (through both layers – see Photo 3)  and make a sc (through both layers)  Make 8 more sc’s, working into each row down the side and through both layers.  Remember to put your initial tail of yarn INSIDE the wedge before closing it completely.  When you get to the end, ch 1 and bind off (Photo 4).
To eliminate the final tail of yarn, insert your hook into one of the stitches at the pointy end of the wedge (from the inside of the wedge to the outside – see Photo 5) and pull the final tail of yarn through to the inside of the wedge (Photo 6).
Pic Wedges Numbers 800x531 Crochet Amish Puzzle Ball Pattern
If you want to, you  can turn the resulting wedge inside-out so that you don’t end up with a seam.  I personally prefer (and recommend) the seam as it helps the Puzzle Ball to interlock better when assembled.

Chain of “lids”

(Make 3)
1. Ch 2.  Sc inc in the second ch from the hook.  Ch 1 and turn.  (2)
2. Sc in each st.  Ch 1 and turn.  (2)
3. Sc inc in each st.  Ch 1 and turn.  (4)
4. Sc in each st.  Ch 1 and turn.  (4)
5. Sc inc in the first st.  Sc in the next 2 st’s.  Sc inc in the last st.  Ch 1 and turn.  (6)
6-9. Sc in each st.  Ch 1 and turn.  (6)
10. Sc2tog, sc in the next 2 st’s, sc2tog.  Ch 1 and turn.  (4)
11. Sc in each st.  Ch 1 and turn.  (4)
12. Sc2tog twice.  Ch 1 and turn.  (2)
13. Sc in each st.  Ch 1 and turn.  (2)
14. Sc2tog.  Do not bind off.
Repeat rows 1 – 14 THREE more times.  This will give you a chain of 4 “lids”.  On the very last “lid” of the chain, ch 1 and bind off.
Crochet Amish Puzzle Ball Chain of Lids Crochet Amish Puzzle Ball Pattern
Hint:  If you are going to use the “lid” colour (so the same colour) to attach the wedges to the lids, don’t bind off.  Just continue with the assembly instructions below.  It just saves having to work away another tail of yarn.
Crochet Amish Puzzle Ball Simple Segment Crochet Amish Puzzle Ball Pattern

Assembling the segments

Amish Puzzle Ball Crochet Amish Puzzle Ball Pattern
Use the yarn you used for the wedges or a third, different colour.  If you are using a new colour, start with a slip knot already on your hook.

You will be attaching 4 wedges to each chain of lids, working up the chain of lids on one side and down the other side, stuffing as you go.  You will be working into each st of the wedge opening and each row of the chain of lids.  See the section below if you are unsure about the placement of the stitches in the rows of the lids.

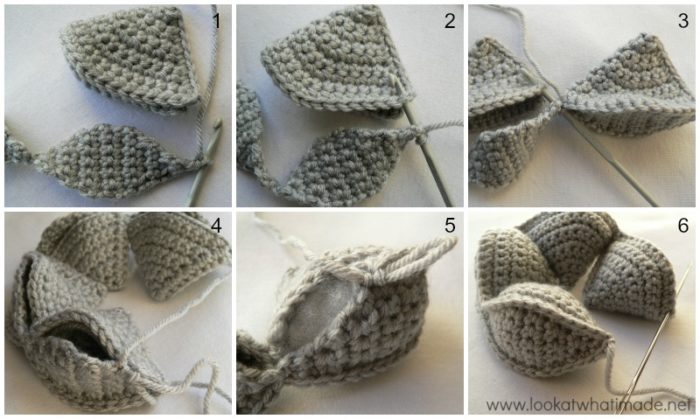
So, place your first wedge behind the first lid on the right (with the sc seam of the wedge to your right – see Photo 1) and insert your crochet hook through the first st of the chain of “lids” and the first st of the opening of one of the wedges (Photo 2).  If you have turned your wedge inside out, or you have worked it in a spiral, start on any st around the top of the wedge.  Make a sc through both layers.  Make 14 more sc’s, working into each row of the lid and each stitch of the wedge (so both layers).

Join the next wedge to its lid in the same way (Photo 3) and continue until you have attached one side of each of the 4 wedges and lids.

Now you will be “closing” the wedges.  Insert your hook into the same (last) st of the fourth lid and the next st of the fourth wedge and make a sc.  Continue working through both layers as before, making 15 sc’s along the other side of each wedge and lid (Photo 5), and stuffing as you go (see A Word About Stuffing below).

When you reach the last st, of the first wedge, join to the first st with a sl st and bind off.  Use the tail to join the tips of the first and last wedges together (Photo 6).

Alternatively you can sl st them together before binding off, which is what I prefer.  To do that, simply sl st in st’s 16 and 15 of the st’s around the top of the 4th wedge (in that order), so the stitches at the pointy end, and then sl st in the first and second st’s of the first wedge.  Bind off and work away your tails.

You have now completed one segment.  Repeat for the remaining 2 segments.
Crochet Amish Puzzle Ball Attaching the Segments Crochet Amish Puzzle Ball Pattern

Having trouble lining up the lids and the wedges?

Although the lids only have 14 rows, there are 15 “holes” along the side of the lid.  This is because the chain st you work the sc inc into in the first row also forms a hole.  So, in essence, you are working into that ch st and then into each of the 14 rows.  I have included a numbered photo below to help explain this.  It is numbered starting from the sc2tog of row 14 ( on the right), where you will start attaching the lid to its wedge, through to the initial ch st of row 1 (on the left), and then back again around the bottom of the lid.  I hope this eliminates a few questions.
Wedge Lid Crochet Amish Puzzle Ball Pattern

Amish Puzzle Ball 11 Crochet Amish Puzzle Ball Pattern 

A word about Stuffing

This ball EATS stuffing! And I have noticed that people tend to think they have overstuffed the ball because the wedges are quite fat and the segments super snug…But the ball will stretch over time and to get the best results you want to stuff it nice and full! If you use too little stuffing the segments won’t sit together as well and the ball is more likely to become lifeless after a lot of playing.   Just don’t stuff it so much that it becomes “holey”.

Building your Crochet Amish Puzzle Ball

When your segments are all nicely stuffed and neatly finished off, use them to build your puzzle ball!
Now, because this is a puzzle, I am not going to explain how you assemble the ball.  But I have included a photo of how the first 2 segments should interlock and a photo of what the ball should look like once assembled.

All you have to do is figure out where the third segment goes.  If you really get stuck, Google it :)
Amish Puzzle Ball6 Crochet Amish Puzzle Ball Pattern

Crochet Amish Puzzle Ball Video Tutorial

by Elizzza from www.knitaholics.com
This video tutorial should answer any questions you may have.  Please note that Elizzza turns her wedges inside out before attaching them to the lids.  I prefer not to turn them inside out.  Keeping the seam on the outside makes it easier to attach the wedges to the lids AND it helps the wedges interlock slightly better when the ball is assembled.