Showing posts with label wallet. Show all posts

Wednesday, April 22, 2015

Bifold Wallet

I found this http://mel-allwrappedup.blogspot.com/2010/11/patchwork-y-bifold-wallet.html

Patchwork-y Bifold Wallet Tutorial
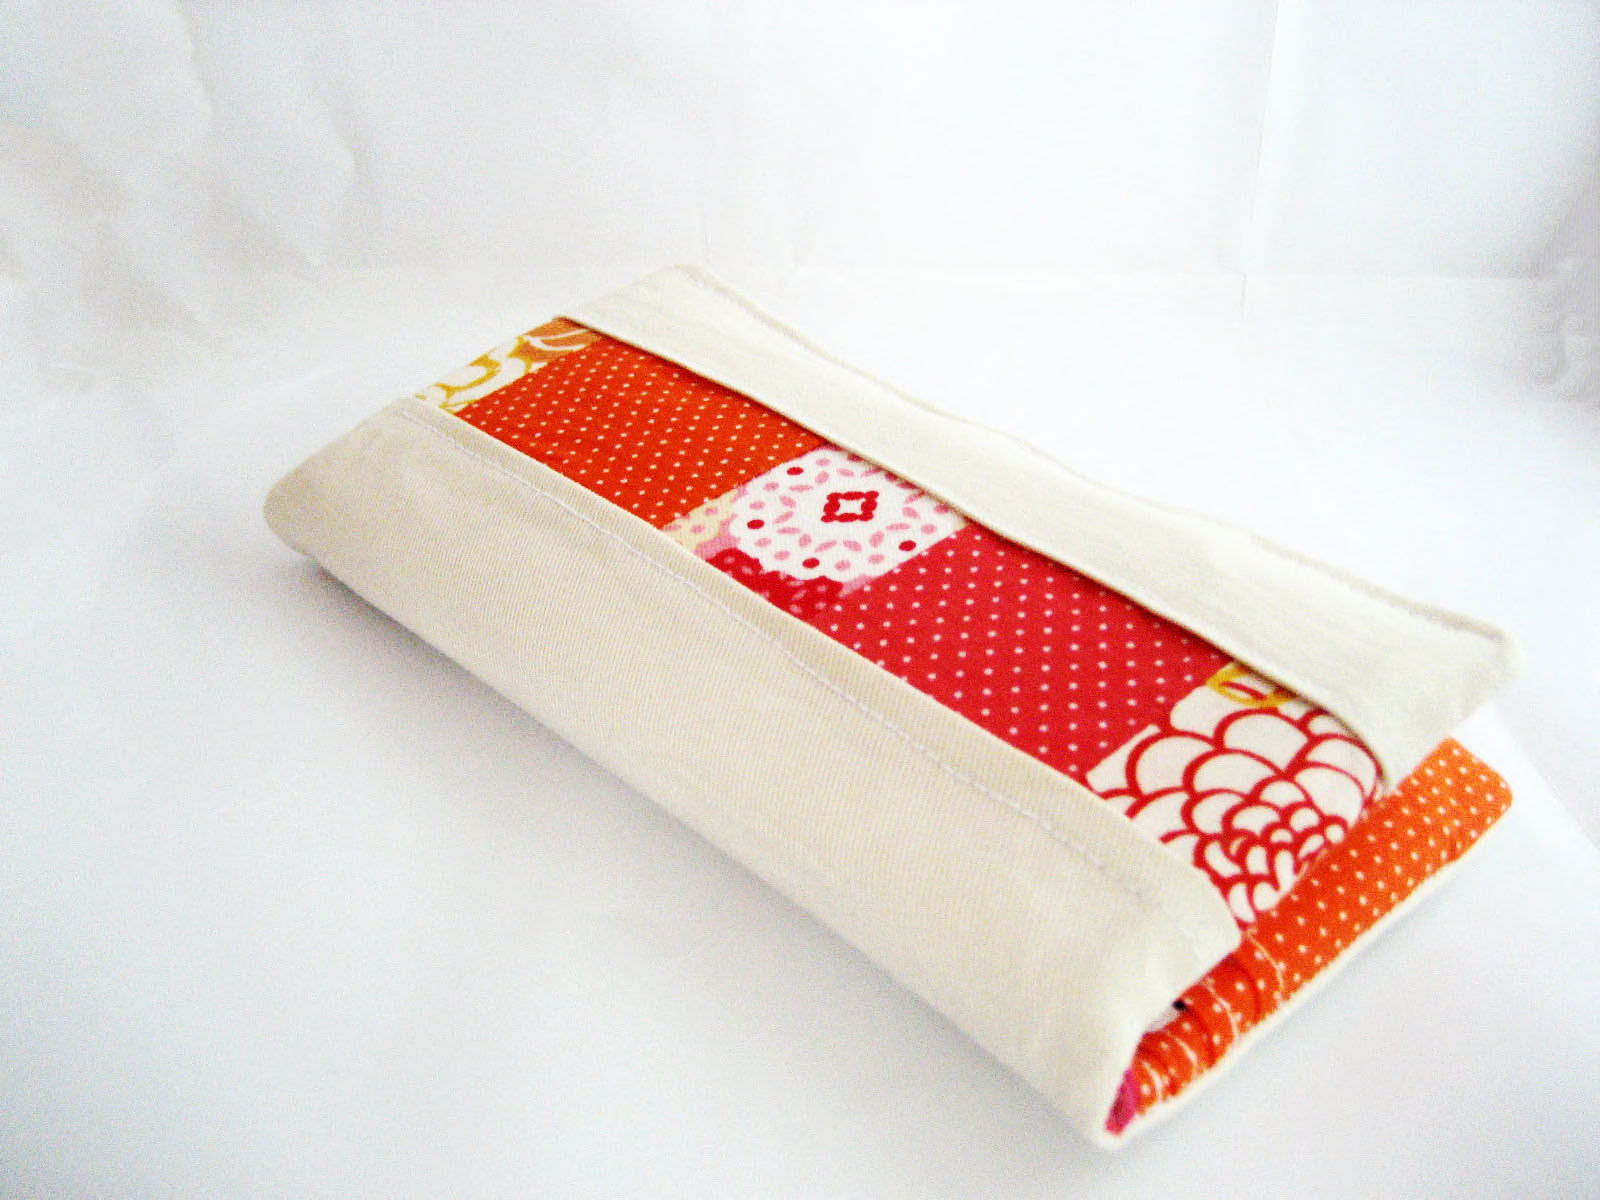
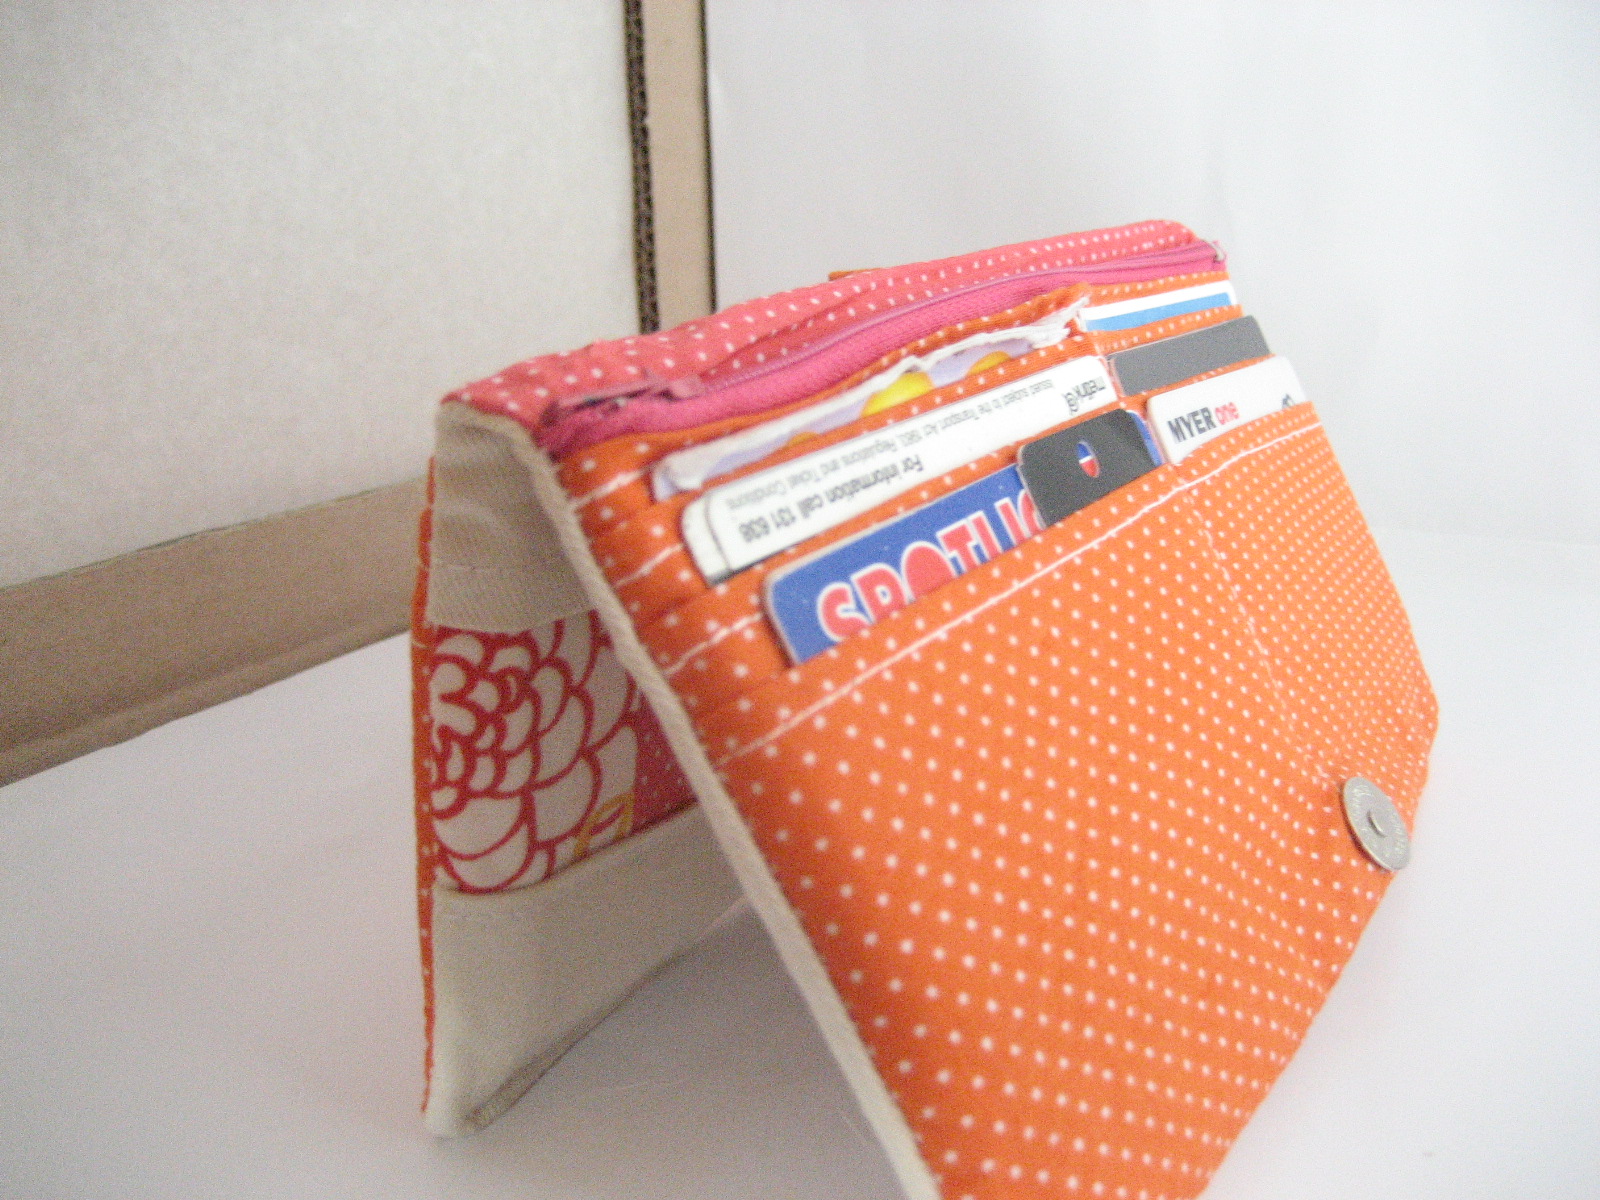


Welcome to my first tutorial – I’m starting off with a wallet – which is a bit tricky and not first post material but I just finished it today and couldn’t wait. I will post smaller tutorials on inserting a magnetic snap closure and other techniques used in this tutorial. Also I have a tendency to type like I speak i.e. really really fast with bad grammar – so if my instructions are confusing at anytime please feel free to ask me a questions =D

 
What you'll need:
  • 1 outer fabric cover rectangle = 22 cm (w) x 20cm (h)
  • 5 patchwork scraps for outer fabric – total = 5cm (w) x 20cm (h)
  • 1 inner fabric rectangle = 22 cm (w) x 20cm (h)
  • 2 interfacing rectangles = 2 x 22 cm (w) x 20cm (h)
  • 2 x fabric for foldable card storage = 2 x 20cm (w) x 51.5cm (h)
  • 8 interfacing rectangles for foldable card storage = 8 x 20cm (w) x 6cm (h)
  • 1 zip pocket fabric = 20cm (w) x 11cm (h)
  • 1 zip pocket interfacing = 20cm (w) x 10cm (h)
  • 1 zipper = 7 inch/ 17 cm
  • 1 magnetic snap 

PATCHWORK STRIP
  • Cut 5 – 6 scraps of co-ordinating fabric to form a 5cm (w) x 20cm (h) strip. 
  • Sew the edges of the fabric together to form the strip.  

  • The patchwork strip should look like this once all the pieces are sewn together: 
 OUTER FABRIC COVER
  • Refer to the picture below


  • Iron the fabric in half (along the green line)
  • Cut out a 1 cm strip out of the rectangle; 3.5cm from the right edge.(red rectangle) 
  • Now, fold and iron a 1cm ‘seam allowance’ from the cut edges of the outer fabric rectangle. (refer to diagram) 


PATCHWORK
  • Pin the patchwork fabric to ironed edges of the outer rectangle fabric (refer to diagram) and TOPSTITCH both sides. 

  • The patchwork strip should now measure 3cm.
  •  Now iron on one rectangle of interfacing to the wrong side of the outer cover fabric. 
INNER FABRIC
  • Iron a rectangle of interfacing to the wrong side of the inner fabric.

FOLDABLE CARD SLOT FABRIC

  • Cut out the 2 foldable card slot rectangles.

  •  Refer to diagram. Fold and iron along the lines to create ‘pockets’ for your cards. It has been bought to my attention that  I have posted an incorrect picture for the credit card slots folding! VERY VERY SORRY. This was my first tutorial and I haven't need to make a wallet since so have not double checked - but will add it to my to do list. The new measurements are 9cm-6cm-5cm-6cm-5cm-6cm-5cm-9cm = 51cm total not 51.5cm.
 
  •   It should look like the diagram. 

 
OR

Alternatively if you are lazy like me, and do not like/ are not very good at measure straight lines try this version:

  • Place two cards on the foldable card slot fabric.


  • Measure 9cm from the top and fold under the cards.
  • Now grab the fabric below the cards and fold the fabric up until it covers most of the cards.

  • Now pull the cards out and iron.
  • Repeat until you have four rows of card slots.
  • Make sure there is 9cm left at the bottom. 

  • Repeat so that you have two of these.

INTERFACING

  • Grab the interfacing for the card slot fabric.
  • Slip one piece in between the different card slots (refer to diagram). 


  • Once all the interfacing is ironed on it should look like this at the back.


  • Now flip the card slot fabrics so they resemble card slots and topstitch across the top of each slot.
  • Once topstitched it should look like the picture below.


  • Attach magnetic snaps on each side of the card slot fabric. (will post a tutorial on this later)
  • Now sew a straight line down the middle of the card slot fabric and down both of the edges (as close to the raw edge as possible as this is just to hold everything in place).  Repeat for the other card slot fabric.
ZIPPER POCKET

  • Grab the zipper pocket fabric. Iron down a 1cm ‘seam line’ from the top edge (long edge). 
  • Flip fabric so the wrong side is facing up. Iron on interfacing (over the folded over  ‘hemline’)

  • Grab the zipper and pin one edge to zipper pocket fabric  and the other side of the zipper to one of the card slots fabric.


  • Now sew along both sides. 


  • Keep zipper closed and iron most of the way up – leaving about 3cm from the end. 


  • Lift up the sewing machine foot and unzip the zip and then continue sewing. (if you were to continue sewing with the zipper closed the foot would get in the way and your sewing machine would make a a horrible crushing gurgling noise that's some kind of awful, and the needle will bend. It will ruin your life - not really but from experience - 3 bent needles (just from zippers) and lots of unpicking - it's easier to lift up the sewing foot - promise)


  • Now repeat for the other side.


PIN IT ALL TOGETHER

  • Place the two card slot on top of the inner fabric rectangle. Baste around the card slots onto the inner fabric along 3 sides – as close to the raw edge as possible. This now forms part A.


  • Grab part A and the outer wallet cover, place the good sides together. Again baste the same 3 sides as before. Making sure to sew inside the previous basting line (so it does not show up when the wallet is turned out)


  • Turn the wallet out and make sure there are no holes or visible seams. 
  • Now turn it in on itself again and trim all the raw edges to reduce bulk. 
  • Turn it out and press it realllllllly hard to make it 'sit' nicely. 


  • Now grab the free edge and fold them in on themselves. Topstitch the free edge as shown in picture.


And so your done =D


Happy sewing! 


Zipper Passport Wallet

I found this http://www.elainescrafts.com/sewing/zippered-passport-wallet-sewing-tutorial/

Zippered passport wallet
SEP 15, 2013 BY     1 COMMENT     POSTED UNDER: SEWING
I have been wanting to make another zippered wallet that will hold my passport and over sized visa ID for ages now. I was using a simple zippered pouch but it was a bit too large. I also have a few passport wallets that fold in half but I would rather use one that is zippered up to not lose anything. Plus I wanted separate pockets for change, cards, IDs and cash. Before, I was digging around the pouch trying to pick coins out from in between the IDs and cash which was a pain.
I got the inspiration after seeing this Three Ring Binder Pencil Case. I love the fabrics that were used and decided that it would make a perfect wallet. I used the great tutorial but shrank the size and added a divider inside the wallet for cards and then used bias binding to finish the wallet. I love the way it turned out! The tutorial for the binder was set up perfectly so I am basing this off of that then adding the changed/added parts. If you need help beyond my pictures, the original tutorial also has great shots!
passport-wallet-tutorial-1
To create the wallet you will need the following supplies:
  • 2 zippers cut to 6.25″ (I only had invisible zippers but you can use regular ones)
Outer Fabric:
  • 1 – 6.5″ x 3″ = front bottom below zip
  • 1 – 6.5″ x 2″ = front top above zip
  • 1 – 6.5″ x 4.5″ = back
  • 8 – 1″ x 2″ = zip ends
  • 1 – 1 5/8″ x 19″ = bias tape (double folded)
Lining Fabric: (I used the same as the outer)
  • 1 – 6.5″ x 6.5″ = front pouch lining
  • 2 – 6.5″ x 4.5″ = main pouch lining
Inside Credit Card Pocket/Divider: (I used the same as the outer)
  • 1 – 6.5″ x 7.5″ = divider
  • 2 – 6.5″ x 5.5″ = card slots
Interfacing: (original tutorial used fusible fleece but I can’t get anything similar to that or interfacing where I live so I used canvas)
  • 1 – 6.5″ x 3″ = front bottom
  • 1 – 6.5″ x 2″ = front top
  • 1 – 6.5″ x 4.5″ = back
  • 1 – 6.5″ x 3.75″ = inside divider pocket
* I used 1/4″ seam allowances throughout except for basting where I used 1/8″.
Instructions:
Leaving zipper open a bit, sandwich ends between 2 pieces of zip end fabric with both fabric pieces facing the right sides towards the zipper. Sew a 1/4″ seam. Trim the zipper ends to 1/8″. Fold the ends out then press.
passport-wallet-tutorial-2
Connect your front bottom, front top and back interfacing pieces (per package instructions) to their corresponding outer fabric pieces. I basted the canvas pieces to my fabrics using a 1/8″ seam.
passport-wallet-tutorial-3
Place a zipper, face side down, on the right side of the front bottom piece. Place the front pouch lining, right side down, on top of the zipper. Line up the edges, pin then sew in place using a zipper foot.
passport-wallet-tutorial-4     passport-wallet-tutorial-5
Turn the zipper right side out and press. The lining and front bottom piece should both be turned down. Top stitch along the zipper.
passport-wallet-tutorial-6
Place the top front piece, right side down, on the zipper.
passport-wallet-tutorial-7
Flip the whole thing over and fold up the lining so the bottom edge lines up with the top edge of the zipper. Pin in place then sew along the zipper with the zipper foot.
passport-wallet-tutorial-8     passport-wallet-tutorial-9
Flip the top front up then top stitch along the zipper. The lining will now be encased for the coin purse of the wallet. Cut off the zipper tab ends.
passport-wallet-tutorial-10     passport-wallet-tutorial-11
Now take your second zipper and place it on top of the front piece facing down. Lay one of the lining pieces on top facing down toward the zipper then sew in place.
passport-wallet-tutorial-13     passport-wallet-tutorial-14
Turn the zipper right side out with the lining and front top piece folded down. Press.
passport-wallet-tutorial-15     passport-wallet-tutorial-16
Top stitch along the zipper and cut off the zipper end tabs.
passport-wallet-tutorial-17
Lay out your last main pouch lining piece facing up then place the zipper on top also facing up. Next add the back piece facing down towards the zipper. Sew along the top of the zipper.
passport-wallet-tutorial-18     passport-wallet-tutorial-19
Fold open the seam and press. Then top stitch along the zipper. This is how the front and back should now look.
passport-wallet-tutorial-29     passport-wallet-tutorial-21
Take your inside divider and card slot pieces, fold them in half then press. Insert the divider piece of the interfacing/canvas inside the divider piece and baste in place along the three open sides. Then top stitch along the folded edge.
passport-wallet-tutorial-22     passport-wallet-tutorial-23
Now take your 2 pressed card slot pieces and pin one to each side of the divider piece. Baste in place.
passport-wallet-tutorial-24     passport-wallet-tutorial-25
Mark the half way point of the card slots and top stitch them in place. That way each side will hold two cards.
passport-wallet-tutorial-26     passport-wallet-tutorial-27
Pin the divider piece onto one side of a lining piece with right side up making sure to only attach it to the lining and baste in place.
passport-wallet-tutorial-28
The original tutorial finished off the binder by turning it inside out after sewing the openings shut but since mine is thicker due to the canvas, I finished off the edges with bias binding. I pressed my bias tape into a double fold before attaching it with a 1/4″ seam. I attached my bias using this method.
passport-wallet-tutorial-31
I am so happy with the finished wallet! I wanted it to fit nicely around my passport without being too large. It also fits my huge EU ID and Euro cash perfectly. Dollars have to be folded in half though because they are strangely long:)
passport-wallet-tutorial-33     passport-wallet-tutorial-32