Showing posts with label papercraft. Show all posts

Wednesday, July 27, 2016

Paper Flower

I found this at http://www.thecraftpatchblog.com/2013/04/paper-flower-tutorial.html#.V5iurfmANBd


Fun, huh?! I'm seriously in love!

Ready for the tutorial? All you need to make your very own flower is scrapbook paper, scissors and a hot glue gun.

Step 1. Start by cutting out petals. You will want six each of three varying sizes. You can experiment with petal shapes and sizes to make all different variations of flowers.  And just to give you an idea of size, my petals were about 3", 4" and 5" and the finished flower turned out to be about 11" across. 
Two sizes of petals. (I had already used one stack when I remembered to take the picture.)

Step 2. Place a small dot of hot glue at the bottom center of a petal.

Step 3. Press the petal together and pinch until the glue cools. Gently curl the outside edges so they are slightly rounded. Repeat with all six same-sized petals.

Step 4. Place a small dot of glue on the bottom right corner of the petal.

Step 5. Press the glue onto the left corner of another petal, lining up the corners with right sides together. Repeat until all six petals are glued together into a circle. Then do the exact same thing with the other sizes of petals. Each size will make it's own ring.

Step 6. Put hot glue on the back of the smallest petals and glue them to the medium layer. Glue the medium layer to the largest layer.

See how I spaced the petals so they overlap and aren't lined up perfectly? Remember that when you are gluing the layers together. You don't want the tips of the petals all lined up or it won't look right.

Step 7. Make something decorative to cover the center hole. I layered paper circles and added a stamped butterfly on this one, but the possibilities are endless....buttons, rhinestones, words, photos...there are tons of cute possibilities.

The last thing I did was to add a paper loop on the back to make them easy to hang up.

Just to show you how versatile this method is, here is another flower I made using the same technique: 
It has a completely different feel to it! All I did differently was cut out rounded petals that were a little longer and skinnier. I also added pointed leaves in another color around the outside and a big yellow button in the center.

Some other ideas to get your creative juices flowing:

- Use glitter paper. Because everything is better with glitter!
- Try crinkling the paper before assembling everything. It will give it a softer, antique look.
- Ink/distress around the edges of each petal before assembling.
- Make two identical flowers and glue them back-to-back to make a flower that looks good from both sides.
- Try using vellum or embossed paper.
- Sew around the edges of each petal before assembling. The stitching would be such a cute detail!
- Make a jumbo flower with layer after layer of petals.

I think I need to make a hundred of these. They are so fun and the possibilities are endless!

Well, I was true to my word. haha. Check out THIS post to see all the different flowers I made!

Wednesday, February 18, 2015

Binding Long-Stitch

I found this on http://sas-does.blogspot.com/2005/01/long-stitch-binding-tutorial-part-1.html and for part 2 http://sas-does.blogspot.ca/2005/01/long-stitch-binding-tutorial-part-2.html  I have combined it all on this webpage

Long-stitch binding tutorial - part 1
In the first part of the tutorial we'll be preparing pages, assembling signatures, and taking measurements for the long-stitched notebook.

1. For this project you will need:
·                     cutting mat (optional but useful)
·                     ruler
·                     x-acto knife or scissors
·                     pencil or pen
·                     needle and thread (used in the second part of the tutorial)
·                     awl (could be replaced by a thick needle, a knitting needle, or any other spiky object)
You will also need:
·                     one-side printed paper (9 sheets)
·                     thicker paper for the notebook cover
___________


2. Fold each one-side printed paper in 4, so that the printed side gets "hidden" inside.  To do so, first fold the page width wise (printed part inside) and then fold it once again to make a 4 1/4 x 5 1/2 rectangle.
___________


3. When all future pages are ready, separate them in groups of 3 (three groups in total) and put one page inside the other, as shown on the picture. 
___________


4. You should end up with 3 signatures - the notebook block.
___________


5. It's now time to figure out dimensions for the cover.  The height of the cover equals the heights of the block (5 1/2 inch).
The width of the cover equals (the width of the block) x2 plus the width of the back of the block (aka the depth of the block).  To measure the depth the block, slightly squeeze signatures together (like on the photo above).  The depth of my block measured a little bit less than 1/32 inch.
The total width of my cover was: 4 1/4 + 4 1/4 + 1/32 = 8 17/32
You can add about 1/8 inch to height measure and width measure - this way your block will be sitting deeper inside the cover.. 
___________


6. Once the cover is measured and cut you will need to score and fold it.  Just measure 4 1/4 of both sides and score lines.
If you added extra 1/8 to your total measure you have to take it in consideration, when scoring  and folding the cover. 
___________


7. When folded, your cover should look similar to the one above.
___________


8. It's now time to mark and pierce signatures.  The height of the signature needs to be divided into 5 sections.  You can choose to have equal-sized section or, like me, make the top and the bottom section bigger (or smaller).  My 3 middle sections measured 1 inch each and my top and bottom sections were 1 1/4 inch each. 
___________


9. Using an awl or a thick needle pierce signatures one by one.  To ensure that holes are spaced equally on each signature use one of them as a guide.
___________

10. The last step is making horizontal slits in the cover.  Once again use one of the signatures as a guide to mark the back of the spine.  Make horizontal slits on the back without crossing the hinge-folds.


-------------------------------------


1.Begin with the first signature.  Pass the thread through the first hole in the signature (from insideand through the first slit in the cover leaving a tail inside the signature.  You will use it to tighten and secure your stitches.
Wrap the thread around the end of the block and the cover, near the hinge-fold.  Bring the thread in and tie two knots. 

___________

2. Pass the thread into the second signature hole and through the cover.
___________


3. And then from outside into the cover and the third hole and from inside out through the fourth hole and the cover.
___________


4. Wrap the thread around the end of the booklet and cover.
___________

5. Pass the thread through the fourth hole of the booklet but not through the cover.
___________


6. Pass the thread through the fourth hole of the second signature.
___________


7. Wrap the thread around the end of the block and insert it through the slit in the cover and back into the last hole.
___________


8. Pass the thread from inside into the third hole and slit and then from outside into the second slit and the hole.
___________


9. Pass the thread from inside out through the first hole and the cover slit.  Wrap the thread around the end of the booklet.
___________


10. Insert the needle into the first hole of the signature.  Do not go through the cover.

___________


11. Bring the third signature and pass the thread from outside into the first hole.  Wrap the thread around the end of the booklet and pass it through the slit in the cover and back into the first hole of the third (last) signature.

___________


12.  Similarly to the first and second signature, pass the thread in and out: into the second hole and slit from inside ..

___________


13. From outside into the third slit and the third hole ...
___________


14.  Into the forth hole and the slit, around the end of the block and once the thread is inside, tighten all the stitches, tie the thread and your are done!

___________


15.  This is how the notebook looks inside.
___________
Although the description of the process seems long, this type of binding is much easier than the coptic stitch.  I also like that the notebooks made this way lay flat when open. Decorative stitching adds a cute touch to these notebooks.


Monday, October 13, 2014

Paper Plate Skeleton

Found on http://www.ivillage.com/halloween-crafts-kids/6-b-279466?nlcid=tk|10-13-2014|&_mid=8448432&_rid=8448432.97200.31923.2#543949

Paper Plate Skeleton

What You’ll Need: Paper plates, pencil, jute and a black marker

Directions: Trace and cut out a skull, arm, leg, neck, hands, feet, a rib cage and pelvis from white paper plates. Draw a face on the skull and then punch holes at the edges of each skeleton piece. Attach the skull to the neck bone with a piece of jute. Continue building your bony man, adding each piece in order -- arms, hands, body, legs and feet.

Paint Chip Halloween Craft

Found on http://www.ivillage.com/halloween-crafts-kids/6-b-279466?nlcid=tk|10-13-2014|&_mid=8448432&_rid=8448432.97200.31923.2#543938


 Paint Chip Halloween Craft


What You’ll Need: Paint chip cards in seasonal colors (orange, green, yellow, purple), black, white and green construction paper, glue

Directions: Cut eyes, mouths, hair, teeth, leaves, noses and hats from the colored construction paper. Glue eyes, nose and a mouth to an orange paint chip to create a jack-o-lantern (add a few green leaves to the top for a stem); or attach eyes and a mouth to a yellow paint card for a candy corn character. Repeat with other colors to make a witch, Frankenstein monster and more.

Thursday, September 11, 2014

Quilling with Toilet Paper Rolls

I found this on http://suzyssitcom.com/2011/09/feature-friday-faux-brass-wall-clock.html


recycled toilet paper tubes faux brass wall clock

 Materials:
- inexpensive plastic clock. Could be cool to go around a mirror also.
-30 toilet paper rolls
-cereal box
-hot glue
-antique brass metallic spray paint
-one sheet of scrap book paper
-number decals

Begin by removing the plastic cover from the clock face and cutitng up toilet paper roles.  I cut them lengthwise to open them up and cut them into ~1/4" strips.  For this project, I did not measure them for exact width because I wanted a variety of depth and texture.

 recycled toilet paper tubes faux brass wall clock2
 I wanted larger curls, so I hot glued 2 strips together before I made each curel.  I then curled them around a wooden dowel to create the curls and glued them to the sides of the clock.


recycled toilet paper tubes faux brass wall clock4Keep adding sprails to get the shape you want.
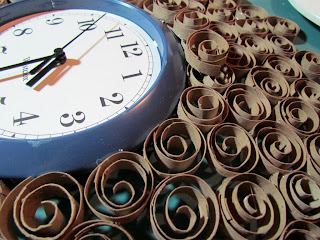
recycled toilet paper tubes faux brass wall clock6Added layers around the clock for  more depth.

 recycled toilet paper tubes faux brass wall clock7 For the lager curels I used strips cut from the cereal box.  Now it is ready for painting, I removed the clock hands and the paper that covered the face of the clock.

recycled toilet paper tubes faux brass wall clock8
It took nearly 2 can of pain for this project.  My finished clock is 3.5' in diameter and has tons of nooks and crannies that needed covered.

Note if you take it outside to pain and it is hot the hot glue could melt and you you might be reglue it back together.

Next use the scrap book paper for the backing of the clock.  Used decal numbers.  Replace the hands.


Iris Folding Book Cover

I found this on http://suzyssitcom.com/2012/08/creating-colorful-bookcovers-with-astrobrights-paper.html

With school time just around the corner, I came up with a school craft project that incorporates brightly colored paper.  I created fun book covers using the technique called Iris Folding.
iris folded bookcovers / suzys artsy craftsy sitcom

Materials:
-Colored paper
-Paper bag
-Glue stick
-Glue
-Scissors


Begin by cutting you bag open, then cut off bottom flap, so that you ahve one large sheet of paper.  With printed side up, place book on top and fold down the top and bottom edges of the paper to match the top and bottom of the book.


Fold one end of the paper and slide the front cover of the book into the open end until the edge of the cover meets the fold.  Close the book and crease the other end of the paper where the edge of the back cover meets it.  Slide the back cover into the open fold.  Now the book cover is complete.


Print off above image http://suzyssitcom.com/iris-folding-pattern-2  If the link doesn't work the pdf can be downloaded here.


Choose a color and cut a strip of paper that is wider than you numbered section when folded.  Fold it lengthwise and place over the section, starting with section one.  Be sure the fold is towards the center and facing up.  Place folded paper in section 2, tacking the two strips together with a glue stick. Repeat this process around going in numerical order.


Continue around


Final piece is a simple square glued to cover the center.


Flip your project over.


For the heart cover, I drew a heart on the cover of the book that is just a bit smaller that finished Iris Fold.  Unwrap the book and cut the shape of the heart out.


Flue the Iris Fold into the inside of the cover using tacky glue with the front side of the iris fold against the inside of the front cover.