Found on https://growingupherbal.com/how-to-make-deliciously-healthy-ginger-chews/
Tuesday, June 18, 2024
Ginger Chews
Wednesday, April 24, 2024
Yarn Over TShirt Rug
I want to save this.. https://moralefiber.blog/2016/04/03/2298/comment-page-1/#comment-445
T-Shirt Rug Tutorial
APRIL 3, 2016 / REGINAALEXISWEISS
I got the idea of using yarn to crochet around the t-shirt strips from Pinterest (of course) but felt that I could make things a little more interesting by experimenting with stitch designs..
…. which was fun, but sometimes one desires a more mindless exercise. So I experimented with ducking the t-shirt yarn strip in front of and behind the stitch, and came up with a design that makes the strip form eye-pleasing rings of bobbles or nubs, or in the case of my most recent rug, stones on sand.

Crocheting around the T-shirt yarn in this way is soooooo much easier, neater-looking, and more economical than trying the crochet the t-shirt yarn itself. I always make my own t-shirt yarn, so it’s also better because it’s easy to switch from one ball to another with this method.
Crocheted T-shirt Rug How-To

UPDATE 3/2020: I now have a video on my YouTube Channel that demonstrates this technique.
A large amount of cotton or acrylic yarn (A skein of Caron One Pound usually gets the job done nicely, with some to spare)

Continuing to work in the round (and adding increases where necessary), hold the t-shirt yarn to the back of your work and work a sc in the next stitch. Keep in mind that the t-shirt yarn should be completely to the back of the work so that the yarn is not held within the stitch at all.
*Tightening the sc after working it by holding the loop steady and pulling on your working yarn makes the rug nice and firm and helps the t-shirt yarn bobbles look neat.
Before you work the next stitch, bring the t-shirt yarn completely to the front of the work, so that you are working your next sc behind the t-shirt strand.

Work the next sc, tighten it down if necessary, then return the t-shirt strand to the back of the work – this will wrap the t-shirt yarn around the stitch you just made, creating a little t-shirt bobble.
With the t-shirt yarn at the back, make another sc in the next stitch.

Continue alternating holding the t-shirt yarn in front or back, until you get near the end of the strand or decide to change colors. Return the t-shirt yarn to the top of your work and work a series of several sc stitches OVER the yarn, so that it is trapped in the stitch again. Do this until the end is reached, then begin the next strand the same way.
I like to vary the proportion of bobbles in the front (i.e – bring the t-shirt yarn to the front every two stitches, every three stitches, etc) to provide visual interest, or alternate rounds of bobbles with rounds of t-shirt yarn carried along inside openwork stitches.
T-Shirt Yarn Rug Video Demo:
UPDATE 3/2020 & 9/2020: I did eventually make a video guide/tutorial for how I make these rugs! It covers the basic strategies of how I start the rugs in Part 1 (following the basic increases formula to produce a flat circle and then adding in the yarn and crocheting around it) and then how to finish a unique rug in Part 2 (goes over the tricks I use to freeform the outer rings of the rug to create decorative stitching).
TShirt Rug Crochet Tutorial https://youtu.be/mVjq-cZbbqY
TShirt RUg Tororial Part 2 https://youtu.be/bAydCORj4LY
Monday, April 15, 2024
Butter Mints
I love butter mints. Loved having them when I was a kid at Grandma Grennan's. I never thought to make them until I saw this facebook reel. So I looked it up online and found this link for reference and it was the same as the facebook reel.
https://www.saltysidedish.com/homemade-butter-mints/
-Add sugar, half and half, vanilla,
peppermint, and salt. Beat on low until dry and crumbly.
-Half and Half NOTE: Powdered
sugar doesn't always measure the same person to person, depending on how its
packed. You may need to add a tiny bit more of half and half to get to this
point if it absorbs too quickly. Just only use a very small amount so you do
not over wet your dough.
-Add 2 drops yellow food coloring and
increase speed to high and beat until smooth and a dough forms.
-Sprinkle powdered sugar onto a flat
surface.
-Work with a small palm-sized amount of
dough. Cover remaining dough with a damp paper towel so it does not dry while
prepping mints. On a powder sugar dusted surface, roll the mint dough into
a long snake shape about 1/2" thick. Use a sharp knife to cut the mints
into mini shapes that are bite sized. Transfer butter mints to a baking sheet
to dry overnight.
-Store butter mints in an airtight
container.
Monday, January 29, 2024
Sourdough Crackers
I love these discard crackers because I don't have to roll them out.
I found the recipe at this website https://littlespoonfarm.com/sourdough-discard-crackers/
Friday, December 1, 2023
Kombucha
needing a place to save the info I find. Pertinent links https://www.liveeatlearn.com/the-simple-guide-to-kickass-kombucha/
Kombucha
These instructions outline how to make homemade kombucha. For more in-depth instructions and tips, see the article above this recipe card.Ingredients
Making a SCOBY
- 7 cups clean water 1.6 L
- ½ cup white sugar 100 g
- 4 bags black tea or 1 Tbsp loose tea
- 1 cup unpasteurized, unflavored store-bought kombucha 235 mL
First Fermentation
- 14 cups clean water 3.5 quarts, 3.3 L
- 1 cup white sugar 200 g
- 8 bags black or green tea or 2 Tbsp loose leaf
- 2 cups unflavored kombucha (from previous batch or store-bought kombucha) 470 mL
- 1 or 2 SCOBYs 1 per container
Second Fermentation
- Homemade kombucha from the first fermentation
- Sweetener
Instructions
Making a SCOBY
- Make Tea: Bring water to a boil in a clean pot. Remove from heat and dissolve sugar into it. Add the tea and allow to steep while water cools to room temperature. Only when water is at room temperature (test by drawing out some water with a straw), is it ready to work with!
- Add Starter: Pour the sweetened tea into your jar(s), then pour store-bought kombucha in (if you’re using two jars, pour ½ of the store bought kombucha into each).
- Ferment: Cover with a few layers of the tightly woven cloth and secure with a rubber band. Set somewhere dark and room temperature (70-75 degrees F, 21-24 C) for 1 to 4 weeks, until a ¼ inch (½ cm) SCOBY has formed.
First Fermentation
- Make Tea: Bring water to a boil in a clean pot. Remove from heat and dissolve sugar into it. Add the tea and allow to steep while water cools to room temperature.
- Add Starter: With really clean hands, gently remove your SCOBY from the tea and place on a clean plate. Rinse out jar(s). Pour the sweetened tea into your jar(s), then pour in starter kombucha.
- Ferment: Gently place SCOBY into jar then cover with a few layers of the tightly woven cloth and secure with a rubber band. Set the jar(s) somewhere dark and room temperature (70-75 degrees F, 21-24 C) for anywhere from 6 to 10 days. Begin tasting the tea at about 6 days by gently drawing out some of the tea with a straw. The longer the tea ferments, the more sugar molecules will be eaten up, the less sweet it will be.
- And Repeat: Reserve 2 cups from this batch to use as starter kombucha for your next batch (just leave it in the jar with the SCOBY(s)). The rest can move into the second fermentation.
Second Fermentation
- Flavor: Strain kombucha and funnel into bottles, leaving about 1 1/2 inches at the top (3.8 cm). Add your chosen sweetener and seal tightly with lid.
- ***** add raspberry or strawberry plus ginger (1-3t/16oz) + 1/4t - 1t/16oz depending on sweetness of fruit. Or add 10% fruit juice. For 16oz bottle this is .2 cup so a short 1/4c.
- Ferment: Let ferment somewhere dark and room temperature for 3 to 10 days.
- Serve: If desired, strain out fruit before serving. Place in fridge to slow the carbonation process.
Monday, September 18, 2023
SouvenirBlanket-LillaBjorn
Also saved in hobby\crochet folder on google
Materials
Scheepjes Stone Washed, and Scheepjes River Washed (78% Cotton x 22% Acrylic; 50g/130m)
Yarn A: Stone Washed 801 Moonstone x 21 balls
Yarn B: River Washed 957 Eisack x 10 balls, and Stone Washed 810 Garnet x 11 balls
Check all shades of Stone Washed yarn at your local Scheepejs shop, or make a purchase via online retailers: Wool Warehouse* (UK, international shipping), Caro’s Atelier* (NL), Taemombo* (US and Canada).
3.5mm hook
Yarn needle to weave in tails.
Octagon motif measures approx. 14cm/5½in from side to side
Square motif measures approx. 8cm/3¼in from side to side
Finished blanket measures approx. 116 x 166cm/45¾ x 65¼in
blo back loop(s) only ch chain stitch
dc double crochet flo front loop(s) only
hdc half double crochet opp opposite
RS right side sc single crochet
ss slip stitch st(s) stitch(es)
sp(s) space(s) yo yarn over the hook
prev previous WS wrong side
FPdc (front post double crochet): yo, insert hook from front to back to front around the post of indicated stitch, yo, draw up a lp, [yo, pull through 2 lps] twice.
FPtr (front post treble crochet): yo twice, insert hook from front to back to front around the post of indicated stitch, yo, draw up a loop, [yo, pull through 2 loops] 3 times.
FPtr2tog (front post treble 2 together): *yo twice, insert hook from front to back to front around the post of next stitch of same color below, [yo, draw up a lp, yo, pull through 2 lps on hook] twice; rep from * once more, yo, pull through all 3 lps on hook.
FPtr3tog (front post treble 3 together): *yo twice, insert hook from front to back to front around the post of next stitch of same color below, [yo, draw up a lp, yo, pull through 2 lps on hook] twice; rep from * 2 more times, yo, pull through all 4 lps on hook.
tr (treble crochet): yo twice, insert hook in indicated stitch, yo, draw up a loop, [yo, pull through 2 loops] 3 times.
tr2tog (treble crochet 3 together): *yo twice, insert hook in indicated st, yo, draw up a lp, [yo, pull through 2 lps] twice; rep from * once more, yo, pull through all 3 lps on hook.
[…] repeat instructions inside […] as many times as indicated in the pattern.
*…; rep from * as times as indicated in the pattern.
Layout for joining
INSTRUCTIONS
OCTAGON
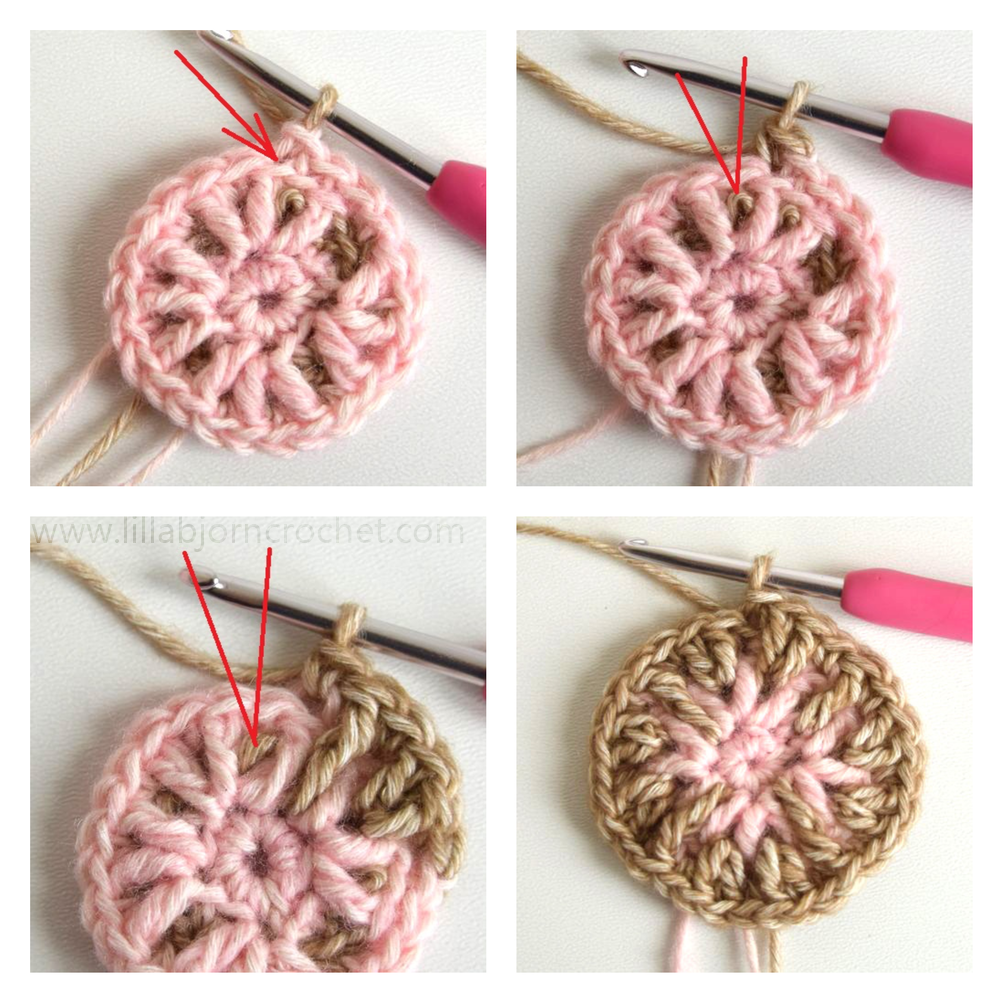
Round 1. With Yarn A make an adjustable ring, ch1 (does not count as a st here and throughout), 8sc into ring, ss to beg sc – 8 sts.
Round 3. Ch1 changing to Yarn B. [Ch2, skip st of opp color, 2dc in st of Round 1 below occupied by dc from prev round (work in front ch2-sp)] rep around, ss to beg sp – 16 dc & 8 ch2-sps.
Round 6. Ch1 changing to Yarn A, [1FPdc around st of same color below, 1sc in next st, 2sc in next st, 1sc in next st] rep around, ss to beg FPdc – 8 FPdc & 32 sc.
Round 7. Ch2 changing to Yarn B in first ch, [2dc blo in FPdc of opp color, 4dc blo] rep around, ss blo to beg dc, ss blo in next 2 sts – 48 dc.
Round 8. Ch1 changing to Yarn A, [1tr2tog flo in prev and next FPdc of same color below, skip no sts behind tr2tog, 4sc blo, 1tr flo in same st as second leg of prev tr2tog, skip no sts behind tr, 4sc blo, 1tr2tog as prev, skip no sts behind tr2tog, 4sc blo] rep around, ss to beg tr2tog – 60 sts.
Round 9. Ch1 changing to Yarn B, [1sc blo in tr2tog, 1dc flo in st of same color below (here and for all dc on this round), 2dc flo in next st, 1dc flo, 1sc blo in next tr of opp color, 1dc flo, 2dc flo in next st, 1dc flo, 1sc blo in next tr2tog, 2dc flo in next st, 1dc flo, 2dc flo in next st] rep around, ss to beg sc – 64 sts.
Round 10. Ch1 changing to Yarn A, *1tr flo in tr2tog of same color below, skip 1 st, 2sc blo, 1tr flo in same tr2tog, skip no sts, 2sc blo, 1FPtr around tr of same color below, skip 1 st, 2sc blo, [1tr flo in next tr2tog, skip 1 st, 1sc blo] 3 times, 1tr flo in next tr2tog, skip no sts, 2sc blo; rep from * around, ss to beg tr – 72 sts.
Round 11. Ch1 changing to Yarn B, *1sc blo in tr, 2dc flo in st of same color visible at the bottom of next V, skip 2 sts, 1sc blo in next tr, [1FPdc around each of next 2 sts of same color below, 1sc blo in next tr] twice, [2dc flo in st of same color visible at the bottom of next V, skip 1 st, 1sc blo in next tr] twice, 1FPtr3tog around next 3 sts of same color below, skip 1 st, 1sc blo in next tr, 2dc flo in st of same color below visible at the bottom of next V, skip 2 sts; rep from * around, ss to beg sc – 80 sts.
Round 12. Ch1 changing to Yarn A (cut B), *1FPtr around tr of same color below (here and throughout), skip 1 st, 2sc blo in next dc of opp color, 2sc blo, [1FPdc, skip 1 st, 1sc blo] 3 times, 1sc blo, 2sc blo in next st, 1FPtr, skip 1 st, 2sc blo in next st, 2sc blo, 1FPtr2tog around 2 sts of same color on both sides of FPtr3tog below, skip 1 st, 2sc blo, 2sc blo in next st; rep from * around, ss to beg FPtr – 88 sts.
SQUARE
Round 1. With Yarn A, make adjustable ring, ch1 (does not count as a st), 8sc into ring, ss blo to beg sc – 8 sts.
Round 2. Ch1 changing to Yarn B, 2sc blo in same st as join, 2sc blo in each st around, ss blo to beg sc – 16 sts.
Round 3. Note: first dc is worked in a st of Round 1 where next inc of Round 2 was made.
Ch1 changing to Yarn A, *skip 1 st on round 1, 1dc flo in next st of Round 1, skip 1 st on Round 2, 1sc blo, [1dc flo in same st of Round 1, skip no sts, 1sc blo] twice; rep from * around, ss blo to beg dc, ss blo to next 2 sts – 24 sts.
Round 4. Ch1 changing to Yarn B, beg in same st as join, *1sc blo in dc of opp color, 2dc flo in st of same color visible at the bottom of next V, skip 1 st, 1sc blo in next dc of opp color, 1tr flo in free st of Round 1 below, skip 1 st, 1sc blo, 2dc flo in st of same color visible at the bottom of next V, skip 1 st; rep from * around, ss to beg sc – 32 sts.
Round 5. Ch1 changing to Yarn A, *1FPtr around st of same color below, skip 1 st, 2sc blo in next dc, 1sc blo in next dc, [1FPdc around st of same color below (here and throughout), skip 1 st, 1sc blo] twice, 2sc blo in next dc; rep from * around, ss to beg FPtr – 40 sts.
Round 6. Ch1 changing to Yarn B, beg in same st as join and working all FPdc around sts of same color below, *1sc blo in FPtr, 2FPtr around next st, 1FPdc around next st, skip 3 sts, 1sc blo, 3FPdc around next st, skip 1 st, 1sc blo, 1FPdc around next st, 2FPtr around next st, skip 3 sts; rep from * around, ss to beg sc – 48 sts.
Round 7. Ch1 changing to Yarn A (cut Yarn B), *1FPtr around FPtr of same color below, skip 1 st, 2sc blo in next st, 2sc blo, 1FPdc, skip 1 st, 3sc blo, 1FPdc, skip 1 st, 2sc blo, 2sc blo in next st; rep from * around, ss to beg FPtr – 56 sts.
JOINING
Here is a video tutorial for an invisible join.
BORDER
Round 1: Attach River Washed Eisack with ss blo in FPtr2tog of any octagon, ch1 (does not count as a st), beg in same st as join, *18sc blo in each st until you reach the bottom of the V on the edge, 1sc3tog working in sc before tr on current octagon, seam and sc after tr on the next octagon, 16sc blo; rep from * around the blanket, ss blo to beg sc.
Round 2: Increases will always be made directly above FPtr. Ch2 changing to Stone Washed Garnet in first ch (cut River Washed), beg in same st as join, *5dc blo, 2dc blo in next st, 10dc blo, dc5tog blo over next 5 sts, 9dc blo, 2dc blo in next st, 4dc blo; rep from * around the blanket, ss blo to beg sc, fasten off.
Weave in all ends. Block blanket to measurements.