https://makemydaycreative.com/2014/10/18/rectangular-diamond-trellis-basket/
Showing posts with label basket. Show all posts
Showing posts with label basket. Show all posts
3/17/18

9/14/15
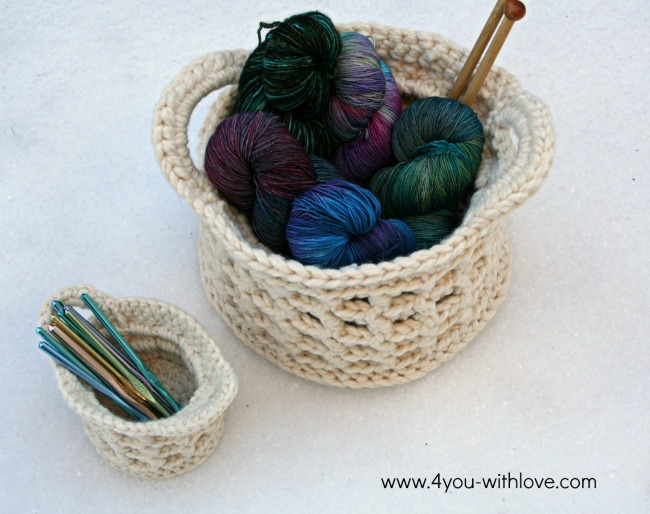
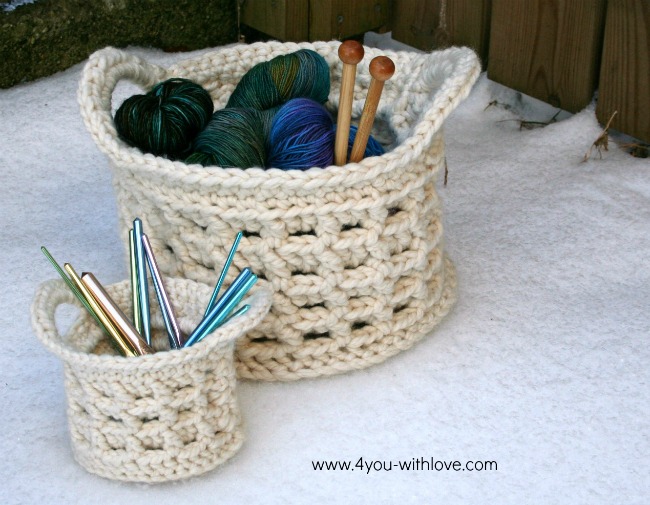
Large Raised Box Stitch Basket
I found this on http://www.4you-withlove.com/2015/01/large-raised-box-stitch-crochet-basket.html


LARGE RAISED BOX STITCH CROCHET BASKET
Finished size: Yours may vary depending on how tightly you can crochet your basket. My basket is 10.5″ wide at the base and 6.5″ high (not including the handles)
Supplies:
- 3 skeins Lion Brand Wool Ease Thick & Quick (106 yd/97 m per skein) or equivalent super bulky weight yarn
- Size N (9 mm) crochet hook
- Yarn needle & scissors
Abbreviations:
- ch chain stitch
- ss slip stitch
- sc single crochet
- hdc half double crochet
- dc double crochet
Gauge: Does not matter. However, the tighter you can crochet, the firmer (but smaller) your basket will be. You really want to crochet as tightly as you can to create a nice firm basket that doesn’t “Flop”.
Directions:
This basket is crocheted holding two strands of yarn throughout.
We will start off by making the base. You will be making a flat circle.
Holding 2 strands together, make a slip not, ch4, join with a ss to form a ring
Round 1 Ch 3 (counts as first dc), 11 dc into the ring, join with ss (12 stitches)
Round 2 Ch 3 (counts as first dc), 1 dc into the base of your chain, *2 dc in each dc to the end of the round* join with ss (24 stitches)
Round 3 Ch 3 (counts as first dc), 1 dc into the base of your chain, *1 dc in the next dc, 2 dc in each of the next 2 dc, repeat from * to last 2 dc, 1 dc in next dc, 2 dc in last dc, join with ss (40 stitches)
Round 4 Ch 3 (counts as first dc), 1 dc into the base of your chain, *1 1 dc in each of the next 3 dc, 2dc in the next dc, repeat from * to the last 3 dc, 1 dc in each of the last 3 dc, join with ss (50 stitches)
Round 5 Ch 3 (counts as first dc), 1 dc into the base of your chain, “1 dc in each of the next 4 dc, 2dc in the next dc, repeat from * to last 4 dc, 1 dc in each of the last 4 dc, join with ss (60 stitches)
Now we are going to transition to working the sides of the basket. To create a a nice clean edge, we will work the next round through the back post/leg of the previous round’s double crochets. You can see photos & a tutorial of how to do this HERE.
Round 6 Flip your crocheted circle over to begin work on the wrong side. Ch 1 (counts as first sc), 1 sc into the back post of each dc to the end of the round. Join with ss (40 stitches).
Here’s a birds eye view of the bottom of my basket (from the inside).

Now it’s time to work the sides of the basket. We will be working the raised box stitch and it consists of two rows: row one is a single crochet/chain stitch combo and row two is comprised of double crochets. To see a pictorial tutorial go HERE.
Round 7 Ch 3 (first ch counts as the 1st sc), skip 2 dc and sc into the third dc, *ch 2, skip 2 dc and sc into the third dc* repeat until 2 dc remain, chain 2 & ss to the first ch to join.
Round 8 Ss into the “2 chain space”, ch 3 (counts as 1st dc), 1 dc in the 2 chain space, 1 dc around the 1 sc post front to back , *2 dc into the 2 chain space, 1 dc around the 1 sc post front to back* repeat to the end of the round ending with the final dc behind Round 6’s initial ch1.
Round 9 Repeat round 5
Round 10 Repeat round 6
Round 11 Repeat round 5
Round 12 Repeat round 6
Round 13 Repeat round 5
Round 14 Repeat round 6
Now it’s time to work the handles. Before I write the directions here’s a quick overview of the next round.
- You will ss the next 10 stitches to create a nice edge to the bottom of your handle & break off your yarn
- You will then return to the first slipped stitch, join your yarn and chain 10 (for the handle).
- Then you create a nice top to the “box” on your box stitches, you will work 20 sc into the back loop of the next 20 dc
- Then repeat for the second handle: ss 10 stitches & break yarn, rejoin yarn, chain 10, 20 sc through back loop of next 20 dc and then you will be back at the start of the round.
Round 15 *Ss the next 10 stitches, break yarn. Join yarn at the first ss, ch 10, 20 sc through the back loop of the next 20 dc* repeat from * ss to join.
Round 16 Ch 1, *15 hdc into the chain 10 loop, 1 sc into each dc for the next 20 dc* repeat from *, ss to join
Weave in ends.
Now you have a crocheted basket to hold your yarn in!
10/10/14
Basket
I found this at http://www.mooglyblog.com/birch-bark-basket/
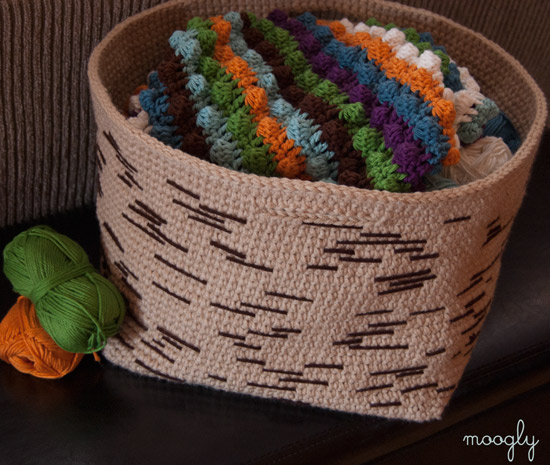
Feeling inspired by nature? I was when I came up with the Birch Bark Basket! This easy crochet pattern is almost more of a technique and tutorial – you can crochet big baskets, small baskets, gift baskets… You get the idea! And each one will have you thinking of a walk in the woods.

This crochet basket pattern as written is pretty big – I find it to be a great storage basket for my other current yarn project! And better looking than plastic baskets too. At about 43″ around, it holds a lot! But this pattern is super easy to downsize. Just crochet the base to the dimensions you desire and work the sides using the technique outlined below.

How to Create the Birch Bark Crochet Stitch Pattern:
This stitch pattern is made using single crochet stitches, and is a sort of offshoot of tapestry crochet. The main color (Color A) is held doubled (two strands held and worked as together as if they were one), and worked in single crochet stitches. Each stitch is worked over a single strand of Color B, enclosing and hiding it behind, or in back of the row. Color B might peek out from the back, but shouldn’t be visible from the outside of the basket.
Then, when you wish to add a stripe of Color B to the pattern, you pull the strand to the front of your work and let it hang. Continue making sc stitches as before, with Color B hanging loose in front of your work. This could be for just 1 stitch, or it could be for as many as 10 – it’s up to you! Then when the stripe is done, pull Color B back behind the next stitch and continue as before, enclosing it in each stitch. Be sure to give a tug to Color B once in a while to make sure it doesn’t sag – but don’t pull so tight that the main color fabric buckles either.
The length of each stripe and it’s placement is completely up to you. Birch bark trees have random (to our eyes) stripes, and like a tree, your basket should be your own unique work of art! Before starting mine, I looked at pictures of birch trees for inspiration, and then just proceeded to add stripes whenever I thought it was a good time to add them. There’s no right or wrong to this, so have fun!

Instructions for the Base of the Basket:
Row 1: Holding yarn from both ends of the skein of Color A together, ch 36. Sc in the 2nd ch from the hook and each remaining ch. Turn. (35 sts)
Row 2 – 40 (or until roughly square): Ch 1, sc in each st across. Turn. (35 sts)
Instructions for the Sides of the Basket:
Round 1: Ch 1, sc in each st across row (place marker in first st and move up with each row), then turning to work into the left edge, sc 36 sts across, then turning again sc in each starting ch, then turning once more, sc 36 sts into other row edges. Join with a sl st to first sc made in this round. (142 sts) NOTE: Exact st count isn’t actually important here so much as using the right number of stitches for the size basket you’re making and your own gauge. If it works and looks better to use a different number, then please do!
Round 2: Ch 1, and laying the end of Color B along the inside of the basket, sc evenly all around the basket, holding Color B behind the stitches and working over it to enclose it in each st. Join to first sc of round with a sl st.
Round 3 – 29 (or until basket is desired height): Ch 1 and sc in each st around, enclosing Color B as before, except when bringing Color B forward to create birch bark pattern (see above for more information on this technique). Join each round with a sl st in the first sc of the round. NOTE: On Rounds 13 and 26 I joined to the 2nd sc of the round and then in Rounds 14 and 27 I worked a st into the sl st. This technique maintained the st count while pulling the joining line back to the left. This is optional, but if you do not do this you’ll need to adjust the placement of the handles from the stitch counts listed below.
Instructions for Making the Handles (optional):
Round 30: Ch 1, sc in the first 12 sts of the round, ch 11, skip the next 11 sts, sc in the next 60 sts, ch 11, skip the next 11 sts, sc in the last 48 sts. NOTE: These are the stitch counts that worked out for me, if you are making a different size or didn’t adjust the joining line as noted above, you will need to move the handles around to suit your project.
Round 31: Ch 1, sc in each st and ch to end. Join with a sl st in first sc.
Round 32: Ch 1, sc evenly around. Join with a sl st in first sc.
Round 33: Ch 1, sl st in 2nd st and each st around. Break yarn and use seamless join to finish off.
Easy, chic, and right on trend in home decor. This crochet basket looks great in a cabin in the woods or in a modern loft – and in a suburban split level in Iowa. The neutral colors and inspired by nature design make it a really neutral piece that still has lots of character. But you don’t have to take my color suggestions! This pattern would be super fun in bright colors too – my head is filled with possibilities, and I know yours is too. So tell me what you think! I love reading your comments! And if you make a Birch Bark Basket, hop over to the Moogly Facebook page and share a photo! We’d love to see it!
Read more at http://www.mooglyblog.com/birch-bark-basket/#4beL6rEVfPUVCu7J.99
Feeling inspired by nature? I was when I came up with the Birch Bark Basket! This easy crochet pattern is almost more of a technique and tutorial – you can crochet big baskets, small baskets, gift baskets… You get the idea! And each one will have you thinking of a walk in the woods.
This crochet basket pattern as written is pretty big – I find it to be a great storage basket for my other current yarn project! And better looking than plastic baskets too. At about 43″ around, it holds a lot! But this pattern is super easy to downsize. Just crochet the base to the dimensions you desire and work the sides using the technique outlined below.
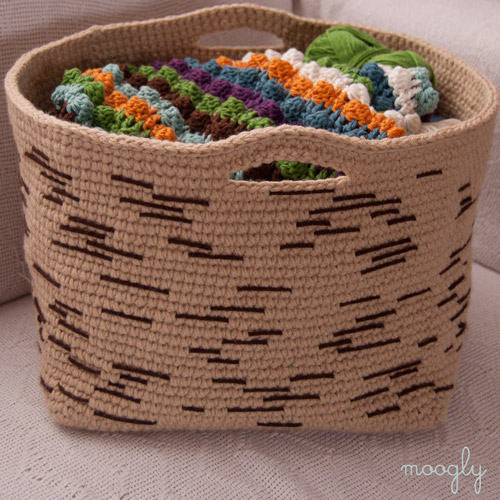
Birch Bark Basket Crochet Pattern
Add this pattern to your Ravelry Queue- US – I, 5.5mm hook
- 900-1000 yds Worsted or Aran weight yarn, as follows: Color A – 826 yds (Caron One Pound in Lace shown); Color B – 100 yds (Caron One Pound in Espresso shown)
- 1 stitch marker
This stitch pattern is made using single crochet stitches, and is a sort of offshoot of tapestry crochet. The main color (Color A) is held doubled (two strands held and worked as together as if they were one), and worked in single crochet stitches. Each stitch is worked over a single strand of Color B, enclosing and hiding it behind, or in back of the row. Color B might peek out from the back, but shouldn’t be visible from the outside of the basket.
Then, when you wish to add a stripe of Color B to the pattern, you pull the strand to the front of your work and let it hang. Continue making sc stitches as before, with Color B hanging loose in front of your work. This could be for just 1 stitch, or it could be for as many as 10 – it’s up to you! Then when the stripe is done, pull Color B back behind the next stitch and continue as before, enclosing it in each stitch. Be sure to give a tug to Color B once in a while to make sure it doesn’t sag – but don’t pull so tight that the main color fabric buckles either.
The length of each stripe and it’s placement is completely up to you. Birch bark trees have random (to our eyes) stripes, and like a tree, your basket should be your own unique work of art! Before starting mine, I looked at pictures of birch trees for inspiration, and then just proceeded to add stripes whenever I thought it was a good time to add them. There’s no right or wrong to this, so have fun!

Instructions for the Base of the Basket:
Row 1: Holding yarn from both ends of the skein of Color A together, ch 36. Sc in the 2nd ch from the hook and each remaining ch. Turn. (35 sts)
Row 2 – 40 (or until roughly square): Ch 1, sc in each st across. Turn. (35 sts)
Instructions for the Sides of the Basket:
Round 1: Ch 1, sc in each st across row (place marker in first st and move up with each row), then turning to work into the left edge, sc 36 sts across, then turning again sc in each starting ch, then turning once more, sc 36 sts into other row edges. Join with a sl st to first sc made in this round. (142 sts) NOTE: Exact st count isn’t actually important here so much as using the right number of stitches for the size basket you’re making and your own gauge. If it works and looks better to use a different number, then please do!
Round 2: Ch 1, and laying the end of Color B along the inside of the basket, sc evenly all around the basket, holding Color B behind the stitches and working over it to enclose it in each st. Join to first sc of round with a sl st.
Round 3 – 29 (or until basket is desired height): Ch 1 and sc in each st around, enclosing Color B as before, except when bringing Color B forward to create birch bark pattern (see above for more information on this technique). Join each round with a sl st in the first sc of the round. NOTE: On Rounds 13 and 26 I joined to the 2nd sc of the round and then in Rounds 14 and 27 I worked a st into the sl st. This technique maintained the st count while pulling the joining line back to the left. This is optional, but if you do not do this you’ll need to adjust the placement of the handles from the stitch counts listed below.
Instructions for Making the Handles (optional):
Round 30: Ch 1, sc in the first 12 sts of the round, ch 11, skip the next 11 sts, sc in the next 60 sts, ch 11, skip the next 11 sts, sc in the last 48 sts. NOTE: These are the stitch counts that worked out for me, if you are making a different size or didn’t adjust the joining line as noted above, you will need to move the handles around to suit your project.
Round 31: Ch 1, sc in each st and ch to end. Join with a sl st in first sc.
Round 32: Ch 1, sc evenly around. Join with a sl st in first sc.
Round 33: Ch 1, sl st in 2nd st and each st around. Break yarn and use seamless join to finish off.
Easy, chic, and right on trend in home decor. This crochet basket looks great in a cabin in the woods or in a modern loft – and in a suburban split level in Iowa. The neutral colors and inspired by nature design make it a really neutral piece that still has lots of character. But you don’t have to take my color suggestions! This pattern would be super fun in bright colors too – my head is filled with possibilities, and I know yours is too. So tell me what you think! I love reading your comments! And if you make a Birch Bark Basket, hop over to the Moogly Facebook page and share a photo! We’d love to see it!
Read more at http://www.mooglyblog.com/birch-bark-basket/#4beL6rEVfPUVCu7J.99
Subscribe to:
Posts (Atom)