5/23/17

Yarn Over TShirt Rug


I found this on https://moralefiber.blog/2016/04/03/2298/


Yarn Over T-Shirt Rug Tutorial


Here’s another project that fits firmly into the “tired of staring at it because it’s been sitting on my desk for over a year so I might as well finish it” category!
StonesonSand2
There’s no real reason that it took me so long to finish, other than I got continuously distracted by other projects and lost my momentum on it. It was the fourth crocheted t-shirt rug from this series that I posted a while ago, in which I allude to the method but don’t provide much of an explanation. Today I am remedying that!
But FIRST! Here’s how to make T-shirt yarn via Endlessly Inspired.
I got the idea of using yarn to crochet around the t-shirt strips from Pinterest (of course) but felt that I could make things a little more interesting by experimenting with stitch designs..
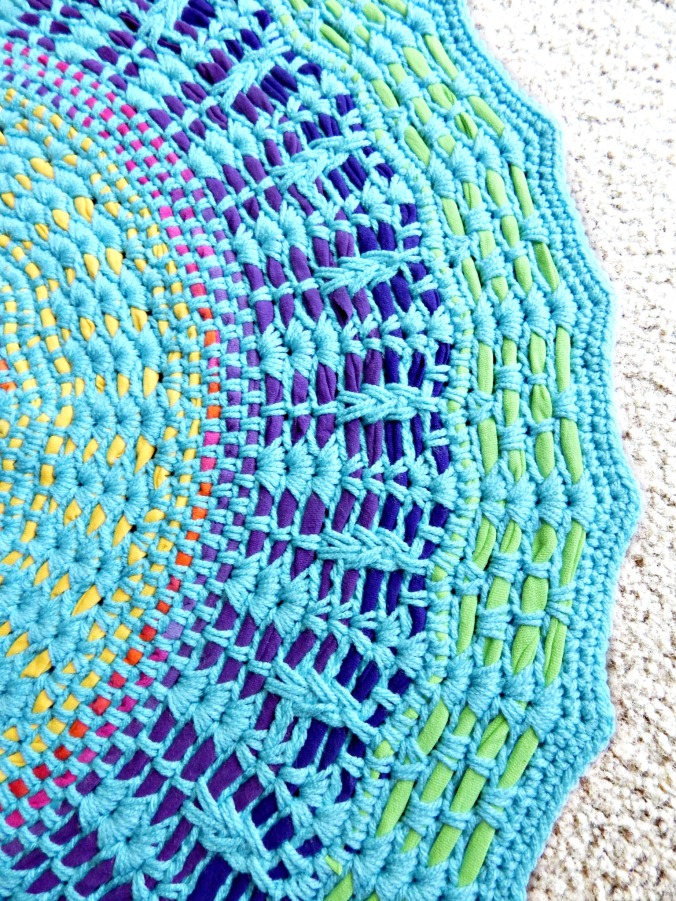
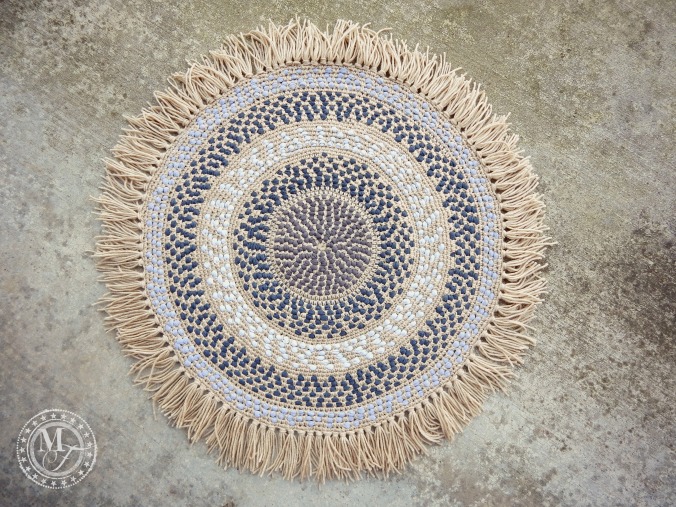
MerryPrankster2…. which was fun, but sometimes one desires a more mindless exercise. So I experimented with ducking the t-shirt yarn strip in front of and behind the stitch, and came up with a design that makes the strip form  eye-pleasing rings of bobbles or nubs, or in the case of my most recent rug, stones on sand.
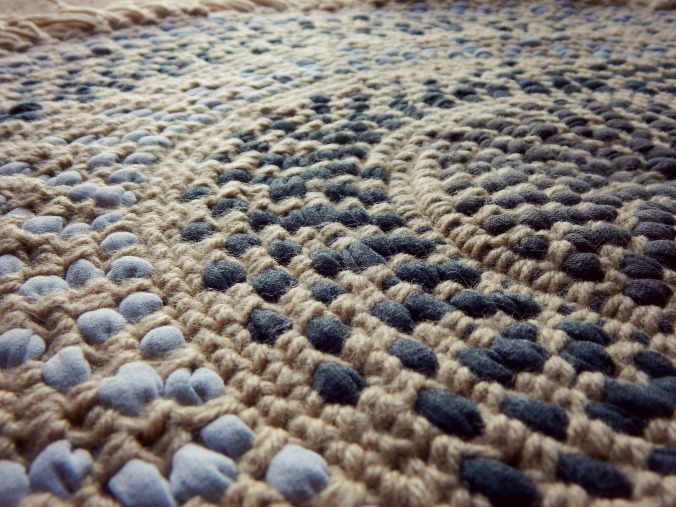
StonesonSand5
Crocheting around the T-shirt yarn in this way is soooooo much easier, neater-looking, and more economical  than trying the crochet the t-shirt yarn itself. I always make my own t-shirt yarn, so it’s also better because it’s easy to switch from one ball to another with this method. So enough talk… how is it done?
Crocheted T-shirt Rug How-To
DSCN4267
You need:
A large amount of cotton or acrylic yarn (A skein of Caron One Pound usually gets the job done nicely, with some to spare)
T-shirt Yarn (I use home-made, but store bought works too!)
A 6.00 mm hook
Start by making a magic ring. 6 sc into the ring tightly. Sc into the first sc of the first round to begin a joinless, in-the-round crochet circle. *
*I will not be giving instructions for increases in the round because I’m making the assumption that the crocheter already knows how to handle this – just work them in the same proportion as you usually would or decide how many you need to keep it flat as you go. 
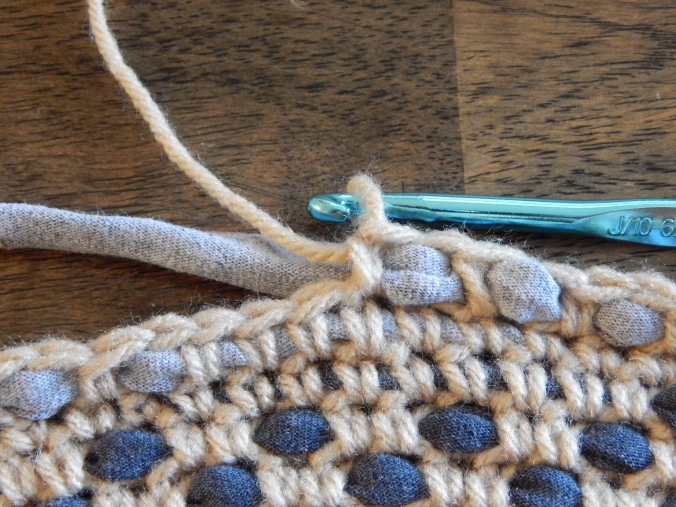
In the second round of stitching, hold the t-shirt yarn flat against the last row and start to stitch the single crochet over the tail of this yarn until you have worked 3-5 stitches or have anchored it securely. Once you have secured the t-shirt yarn, you will begin weaving it in and out of the sc stitches.
DSCN4483
This isn’t a picture of the second round, but you can see where I have begun the new strip by anchoring it within the sc stitching before I start weaving it in and out.
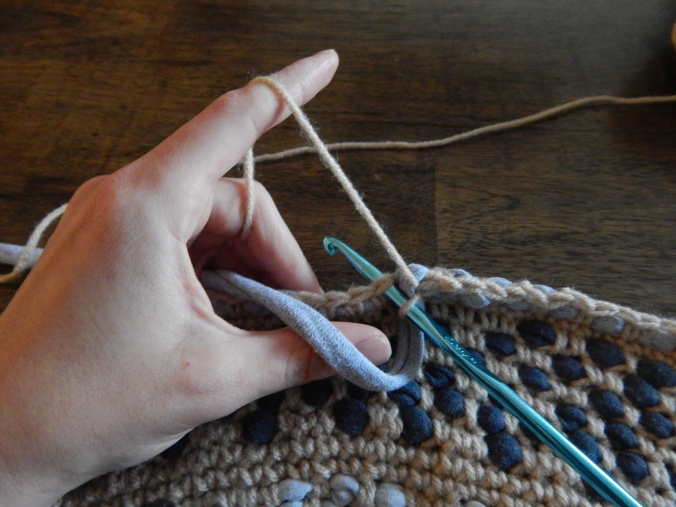
Continuing to work in the round (and adding increases where necessary), hold the t-shirt yarn to the back of your work and work a sc in the next stitch. Keep in mind that the t-shirt yarn should be completely to the back of the work so that the yarn is not held within the stitch at all.
*Tightening the sc after working it by holding the loop steady and pulling on your working yarn makes the rug nice and firm and helps the t-shirt yarn bobbles look neat.
Before you work the next stitch, bring the t-shirt yarn completely to the front of the work, so that you are working your next sc behind the t-shirt strand.
DSCN4490
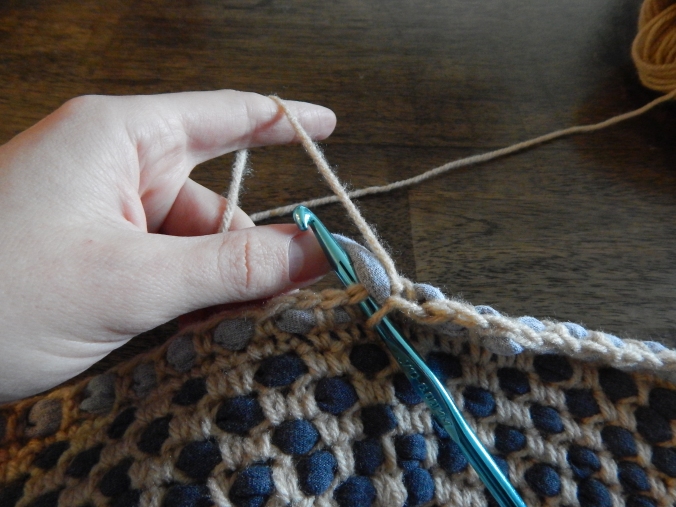
Work the next sc, tighten it down if necessary, then return the t-shirt strand to the back of the work – this will wrap the t-shirt yarn around the stitch you just made, creating a little t-shirt bobble.
With the t-shirt yarn at the back, make another sc in the next stitch.
DSCN4493
Continue alternating holding the t-shirt yarn in front or back, until you get near the end of the strand or decide to change colors. Return the t-shirt yarn to the top of your work and work a series of several sc stitches OVER the yarn, so that it is trapped in the stitch again. Do this until the end is reached, then begin the next strand the same way.
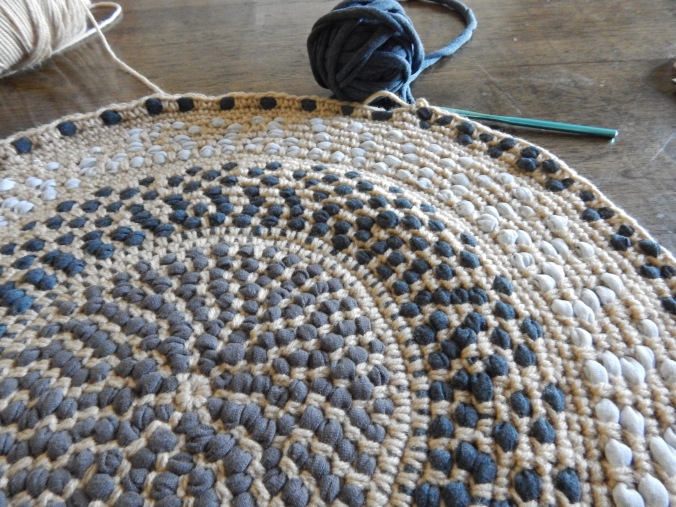
I like to vary the proportion of bobbles in the front (i.e – bring the t-shirt yarn to the front every two stitches, every three stitches, etc) to provide visual interest, or alternate rounds of bobbles with rounds of t-shirt yarn carried along inside openwork stitches.
DSCN1349
T-shirt yarn carried inside openwork stitches (granny blocks in this case)
As I’ve mentioned before, carrying T-shirt yarn along while you crochet regular yarn is a lot easier on your hands than trying to crochet the t-shirt yarn itself!  And this way, there’s tons of variations you can try.
My rugs usually end up being somewhere between 32-45″, for use as small accent rugs or even table centerpieces (and if you use all cotton materials, really awesome hotpads are possible!)

3/23/17

Low Carb Gnocchi

I found this on http://foodcount.com/recipe/homemade-garlic-gnocchi

But it is really located at https://theprimitivepalate.com/2015/01/25/keto-garlic-gnocchi/

Keto Garlic Gnocchi

  • Servings: 2
  • Time: 25 minutes
  • Difficulty: moderate
  • Print
Ingredients
  • 2 cups shredded Mozzarella (Low-Moisture Part-Skim this is a MUST–otherwise it will fall apart when boiled! I find Kraft to work the best!)
  • 3 egg yolks
  • 1 tsp granulated garlic
  • butter & olive oil for sauteing
Method:
  1. Place cheese and garlic in a microwave safe bowl and toss around to combine. Melt cheese in microwave for about 1 to 1 1/2 minutes.
  2. Fold in one egg yolk at a time until a homogeneous dough forms. This actually takes a little elbow grease!
  3. Portion dough into 4 balls.
  4. Chill in refrigerator for at least 10 minutes.
  5. Lightly grease a silpat or parchment (and your hands-it helps from sticking!) and roll out each ball into a 14-15″ log.
  6. Slice each log into 1″ pieces. (If you like, you can press the tip of a fork onto each piece to get that “gnocchi” look but it’s not necessary)
  7. In a large pot, bring about a half gallon of salted water to a boil (like you would for normal pasta). Place all the gnocchi into the pot and cook until they float, about 2-3 minutes. The strain into a colander. (*note: a few of my readers say that have skipped this step and the gnocchi still turns out great!)
  8. Heat a large non-stick pan on medium-high heat. Add a tablespoon of butter and a tablespoon of oil to pan.
  9. Add gnocchi and saute each side for about 1-2 minutes, until golden brown.
  10. Season with salt and pepper and serve!
It’s a seriously rare occasion that I crave pasta. I know, I’m soooo lucky. I should rephrase that, I rarely crave boxed pasta. Handmade pasta is a different story, and gnocchi has always been my favorite. They are like soft little pillows that melt in your mouth…when cooked correctly of course!
Recently, I came up with a recipe for Everything Bagel Dogs and the dough was such a hit! So I’ve been tinkering around with it and came up with this recipe! I was astounded that this dough is able to be boiled and then panfried!
DSC_0812DSC_0817DSC_0822Making this recipe is surprisingly much easier than real gnocchi! Technically all you need are 2 ingredients: shredded mozzarella and egg yolks! I add a little garlic powder to give them a bit more flavor. Normally, when you are boiling gnocchi you have to take them out as soon as they float, or they get extra gummy and not very yummy.
Luckily, these are a different story. I actually let them float around in the boiling water for an extra 5 minutes and they were still soft little pillows.
With only 4 net carbs per serving (a 1 cup serving of traditional potato gnocchi is about 40 carbs) this recipe is a great alternative to pasta! I served mine with roasted wild mushrooms, arugula and panfried pork chops. I’d love to hear what everyone else comes up with!
DSC_0793DSC_0794DSC_0796DSC_0797DSC_0800DSC_0801DSC_0804


12/22/16

All About the Messy Bun

found on ravelry at http://www.ravelry.com/patterns/library/its-all-about-the-messy-bun

Here is the link for the pdf http://www.ravelry.com/patterns/library/its-all-about-the-messy-bun#


Materials: <100g of worsted weight yarn. Red Heart Boutique Unforgettable-Parrot.

Size H Hook & tapestry needle to sew in ends.

Note: The ch2 at the beginning of each round does not count as a stitch. The ch2 is to help hide your join line. When you slip stitch into the top of the chain at the end of each round to join, pull snugly before crocheting into the first stitch. This helps to close up the gap a bit. Notice the join line is hardly noticeable: my color changes happen to occur at the exact point of the join for this hat, creating a very noticeable jog line. More than likely, yours won’t be as noticeable.


Chain 36 and join in the round to the first chain, being careful not to twist. This will give you an
opening that is approximately 2 ½” in diameter.
Row 1: Ch2, DC in first chain stitch and in each stitch around. Join with slip stitch to ch2. 36
stitches.
Row 2: Ch2,* 2 DC in the first stitch, DC in next 2 stitches. Repeat from * around. Join with slip
stitch to the ch2. 48 Stitches
Row 3: Ch2, * 2 DC in the first stitch, DC in next 3 stitches. Repeat from * around. Join with slip
stitch to the ch2. 60 Stitches.
Row 4: Ch2, * 2 DC in the first stitch, DC in next 4 stitches. Repeat from * around. Join with a
slip stitch to the ch2. 72 Stitches.
Row 5- 11**: Ch2, DC in each stitch around. Join with a slip stitch to the ch2.
Should measure 5-5.5".  Total lenght with ribbing should be 7-7.5"

** You can make it longer or shorter by adding or decreasing these DC rows. Take in to account
that the ribbed brim will add approx. 2 more inches to the hat.

RIBBED BRIM:
When you have completed your last DC row and joined to the ch2, ch11 stitches. SC into the
2nd chain from the hook and in each chain to the hat. 10 Stitches.

Slip stitch into the next 2 stitches on the hat (the dc stitches of the last dc row worked in the
round). Ch1 and turn.

(Now begin to crochet into the back loops only)
** Single crochet into the BLO of the next 10 stitches. On the final stitch (10th stitch) on the
edge, crochet into both loops for this row and throughout for a nicer finished edge. Ch1 and
turn.

Single crochet into the BLO of each of the 10 single crochet stitches, then slip stitch into the
next 2 stitches of the last DC round. Ch1 and turn.

Repeat from ** around the entire hat, until you have only 1 stitch left on the hat to slip stitch into
(if you have 2, that’s ok).

Hold the 2 edges of the brim together and slip stitch up the edge to join. Fasten off and weave in
your ends.

ALTERNATE ENDING: (Because sometimes we just need alternatives!)
After making quite a few of these, I decided I wanted a quicker brim. I love love the look of the
single crochet brim, but that is a lot of single crochets! ;) So I’ve been playing around with some
different finishes, and really like this one, so here it is.

Follow pattern through Row 10.
Row 11: Ch2. *DC in first stitch, SC in next. Repeat from * around. Join to beginning ch2.
Row 12: Ch1. *SC in the first stitch, DC in the next. Repeat from * around. Join to beginning
ch1. (On this round you are doing a sc in the dc of the previous round, and a dc in the previous
sc).
Row 13: Ch2. HDC in each stitch around. Join to beginning ch2.
Row 14-19: Ch2. *FPDC around the first HDC of the previous round. BPDC around the next
HDC of the previous round. Repeat from * around. You should end with a BPDC. Join to
beginning ch2.
You can add or subtract as many of these brim rows as you like. As long as the hat, when
finished, is 7 - 7 ½” long, you will have a hat that is sized to fit most average adult heads.

ALTERNATE HAT ROWS: (Because DC’s all around can get boring!)
Work pattern through row 4:
Row 5: Ch2. *DC in first stitch, sc in next stitch. Repeat from * around. Join to beginning ch2.
Row 6: Ch2. *SC in first stitch, dc in next stitch. Repeat from * around. Join to beginning ch2.
Row 7: Ch2. DC in each stitch around. Join to beginning ch2.
Row 8: Ch2. DC in each stitch around. Join to beginning ch2.
Rows 9-12: Repeat Rows 5-8 one more time.
Row 13: Repeat row 5.
Row 14: Repeat row 6.
Row 15: Repeat row 7.
Now you are at the brim. You have a choice to either do the original brim (sc in the blo), or
follow Rows 14-19 of the ALTERNATE ENDING instructions above, adding a nice F&BPDC
ribbing. Note that you will be doing your F&BPDC’s around the double crochet round of row 15
(rather than the HDC rows as indicated in the alternate brim instructions above).


Seashore Messy Bun Hat

I found this through ravelry and it is located at this website http://simplycollectiblecrochet.com/2016/12/seashore-messy-bun-hat/

Seashore Messy Bun Hat free crochet pattern by Celina Lane, SimplyCollectibleCrochet.com

Yarn – Lion Brand Vanna’s Choice, worsted weight, 3.5 oz/170 yds – Aqua
Materials – K/10 1/2 – 6.50mm, yarn needle, scissors
Difficulty –  Easy
Size – Stretchy, Fits 20” loosely to 24” snug
Measurements in Pattern – 4.5” Diameter opening, 7.5” Length, 20” Circumference
Gauge – HDC 4” = 13 stitches, 8 rows
Stitch Guide in American Terms – 
FHDC – Foundation Half Double Crochet
HDC – Half Double Crochet
DC – Double Crochet
Special Stitches – 
FHDC – (Foundation Half Double Crochet) Chain 2, yarn over, insert hook into the first chain (2nd from hook), yarn over, pull up through the first loop on the hook (this is your first chain loop). With 3 loops on hook, yarn over, pull through 3. * Yarn over, insert your hook into the first chain loop, yarn over, pull up a loop (this is your second chain loop), yarn over, pull through 3. 2 FHDC completed. Repeat from * until you reach the desired number of FHDC.
3rd Loop – a.k.a. Back bump, back hump – In this pattern, it is the loop behind the stitch immediately following the back loop. Here’s a video showing where it is. https://www.youtube.com/watch?v=Pdw7_q3HIY0
Notes – Worked from the bottom up in rounds. Chain counts as a HDC. Do not turn your work.
Instructions:
Round 1: FHDC 60, join with a slip stitch to form a loop
Round 2-4: Chain 1, do not turn, working in the 3rd loop, HDC in each around, insert your hook in the space between the chain and the first HDC of the previous row, join with slip stitch – total 60 HDC
NOTE: Work under both loops for the remainder of the pattern.
Round 5: Chain 1, * skip 2, 5 DC in the next, skip 2, SC, repeat from * 8 times, skip 2, 5 DC in the next, skip 2, slip stitch in the same as the chain – 10 shells
Round 6: [Chain 3, 2 DC] in the same stitch as the chain, * skip 2, SC, skip 2, 5 DC in the next, repeat from * 8 times, skip 2, SC, skip 2, 2 DC in the same stitch as the chain 3 from the previous row, slip stitch to the top of the chain – 10 shells
Round 7: Chain 1, * skip 2, 5 DC in the next, skip 2, SC, repeat from * 8 times, skip 2, 5 DC in the next, skip 2, slip stitch in the same as the chain – 10 shells
Round 8: Repeat Round 6.
Round 9: Repeat Round 7.
Round 10: Repeat Round 6.
Round 11: Repeat Round 7.
Round 12: Repeat Round 6.
Round 13: Chain 1, * skip 1, HDC, repeat from * around 28 times, slip stitch to the chain – 30 HDC
Round 14: Chain 1, HDC in each around, slip stitch – 30 HDC
Finishing: Fasten off and sew in the ends.

Easy Peasy Messy Bun Hat

I found this at the following website http://simplycollectiblecrochet.com/2016/12/easy-peasy-messy-bun-hat-crochet-pattern/
Easy Peasy Messy Bun Hat free crochet pattern by Celina Lane, SimplyCollectibleCrochet.com


Yarn – Lion Brand Vanna’s Choice, worsted weight, 3.5 oz/170 yds – Radiant Lime
Materials – K/10 1/2 – 6.50mm, yarn needle, scissors
Difficulty – Easy
Size – 20” circumference, fits 22”
Measurements in Pattern – 4.5” inch diameter opening
Gauge – 4” = 9 rows, 11 stitches
Stitch Guide in American Terms 
HDC – half double crochet
DC – double crochet
Special Stitches – V-stitch – 2 double crochets in the same stitch.
Notes – Worked from the top down in rounds. Do not turn your work
.

Instructions:
Chain 24, slip stitch to form a loop, chain 1, do not turn.
Round 1: HDC in each chain around, slip stitch – 24 HDCs.
Round 2: Chain 2, 2 DC in 2nd space from chain, 2 DC in each space around 23 times, DC in ch space, slip stitch to top of chain. – 48 DC
Round 3-13: Chain 2, * 2 DC in each space between each v-stitch (2 DC) from previous row, repeat from * 23 times, DC in the same as the chain space, slip stitch to top of chain. – 48 dc
NOTE: That does NOT mean EACH space. Rounds 3-13 are NOT increase rows. This is a V-STITCH.
Round 14-16: Chain 1, using the 3rd loop only (behind the stitch- VIDEO below) HDC in each around, slip stitch – 48 HDC
Finishing: Slip stitch, fasten off, and weave in your ends.

10/17/16

Brussels Sprouts

When I was in Nashville we went to a restaurant called Adele's and I had the Brussels Sprouts that was really good. 

I found the recipe https://www.austinfoodandwinefestival.com/2014/thanksgiving-sides-with-chef-jonathan-waxman/

Image

Ingredients

  • 1 pt. Brussels sprouts – washed, stemmed, cut in half
  • 1/2 c. bacon, diced
  • 3 cloves garlic, peeled, stemmed and smashed
  • 2 tbsp. butter
  • 2 tbsp. cream

Directions

  1. In a heavy saute pan cook the bacon with 1 tbsp. olive oil, add the sprouts and cook until golden.
  2. Add the butter, garlic and the cream then season. Bake in 350 degree oven for 10 minutes. Serve warm.

Cauliflower Salad

When I was in Nashville we went to a restaurant called Adele's and I had a cauliflower salad that was really good.  I think it would be a great non-starchy potluck side.

I found the recipe https://www.austinfoodandwinefestival.com/2014/thanksgiving-sides-with-chef-jonathan-waxman/

Although I must admit I won't be using champagne vinegar and will be using rice wine vinegar instead.


Ingredients

  • 8 oz. of raw cauliflower [average head size 20oz (2.5times)]
  • 1/4 c. minced scallions [2/3c]
  • 1 tbsp. golden raisins [2.5T] or cranraisins
  • 1 tbsp. toasted pistachios [2.5T]
  • 1.5 tbsp. champagne vinegar [3.75T or short 1/4c]
  • 2.5 tbsp. olive oil [0.39c or a long 1/3c]
  • 1 tsp. sea salt [2.5t]
  • 1/2 tsp. cracked black pepper [1.25t]

Directions

  1. Slice cauliflower on a Japanese mandolin.
  2. Mix in a large bowl with remaining ingredients.
  3. Season with salt and pepper.