Monday, July 7, 2014

Shawlette

Found on Moogly blog
http://www.mooglyblog.com/sunset-shawlette/

Sunset Shawlette - free crochet pattern made from 1 skein of yarn!
Zauberball is a Fingering / 4 ply wool and nylon blend yarn with a long color repeat. And in this colorway it reminds me of a spectacular sunset. But you don’t have to use Zauberball to make the Sunset Shawlette – use the fingering weight yarn of your choice, solids, stripes, you name it! It would be gorgeous in something sparkly…
Sunset Shawlette - free crochet pattern made from 1 skein of yarn!
The Sunset Shawlette is a lightweight wrap with unique trapezoid shape, which is perfect for draping around the shoulders, tying as a fashion scarf, or wrapping up as a cowl. If you prefer a traditional triangular shawl, just add a second ball of yarn and keep going with the easy 2 row repeat.
Sunset Shawlette - free crochet pattern made from 1 skein of yarn!

Sunset Shawlette

Add this pattern to your Ravelry Queue
  • US – H, 5.0 mm hook
  • 459 yds Fingering / 4 ply weight yarn (Zauberball in Fuchsia shown)
  • Gauge: 15 sts x 14 rows = 4″ in pattern
  • Finished size: 60″ long, 11.5″ wide
  • To change the size, add or subtract a multiple of 8 sts.

Sunset Shawlette: free #crochet pattern with written instructions and a chart! From mooglyblog.com
I would a couple more #1 rows so that it would be wider than 11.5".
Instructions:
Row 1: Ch 203. Dc in the 4th ch from hook, dc in the next ch, ch 3, skip 3 ch. *Dc in the next 5 ch, ch 3, skip 3 ch. Repeat until 3 ch remain, dc in each of the remaining ch. Turn. (201 sts)

Row 2: Ch 2 (does not count as st), skip the first 2 sts, dc in the next st. *Working over the ch 3 from the previous row, work 3 dc sts into the center ch of the skipped ch section of the starting chain directly below. Dc in the next 5 sts. Repeat from * until 6 sts remain. Work 3 dc into the center ch of the starting chain below the last 3 ch section, then dc2tog over the next st and the last st (top of the ch 3), skipping a st in the middle. Turn. (197 sts)

Row 3: Ch 2, skip the first 2 sts, dc in the next 3 sts, ch 3, skip 3 sts. *Dc in the next 5 sts, ch 3, skip 3 sts. Repeat from * until 5 sts remain, dc in the next 2 sts, then dc2tog over the next st and the last st, skipping a st in the middle. Turn. (193 sts)

Row 4: Ch 2, skip the first 2 sts, dc in the next st. *Working over the ch 3 from the previous row, work 3 dc sts into the center st of the skipped st section of the row below the previous row. Dc in the next 5 sts. Repeat from * until 6 sts remain. Work 3 dc into the center st of the skipped st section of the row below the previous row, then dc2tog over the next st and the last st, skipping a st in the middle. Turn. (189 sts)
Sunset Shawlette - free crochet pattern made from 1 skein of yarn!
Row 5 – 28: Repeat Rows 3 – 4. (The st count will reduce by 4 sts every row, so that at the end of Row 28 there should be 93 sts.)

Row 29: Ch 2, skip the first 2 sts, dc in the next st. Dc2tog over the next 2 sts, ch 3, skip 3 sts. *Dc in the next 5 sts, ch 3, skip 3 sts. Repeat from * until 5 sts remain, dc2tog in the next 2 sts, then dc2tog over the next st and the last st, skipping a st in the middle. Turn. (87 sts)

Row 30: Ch 2, skip the first st, dc in the next st. *Working over the ch 3 from the previous row, work 3 dc sts into the center ch of the skipped ch section of the starting chain directly below. Dc in the next 5 sts. Repeat from * until 5 sts remain. Work 3 dc into the center ch of the starting chain below the last 3 ch section, then dc2tog over the last 2 sts. Turn. (85 sts)

Row 31: Do not ch. Skip the first st, sc in the next st and in each st across until 1 st remains, sl st in last st. Turn. (84 sts)

Row 32: Do not ch. Skip the first st and sl st in the next st and in each st across until 1 st remains  Break yarn and use seamless join in last st to finish off. (82 sts)

Sunset Shawlette - free crochet pattern made from 1 skein of yarn!
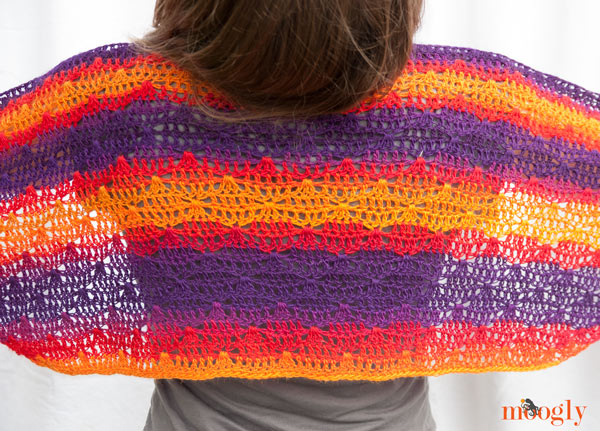
The photo above is the Sunset Shawlette being modeled by my 11 year old daughter – and though she’s smaller than your average adult you can see the great shape and look you get with this stitch pattern. I hope you give it a try!

Wednesday, July 2, 2014

Coffee Filter Roses

Found on Craftberry Bush
http://www.craftberrybush.com/2011/01/rose-tutorial-just-for-you.html


As promised, here is the rose tutorial.  I hope you find the instructions easy to follow.

You will find that the initial preparation takes a little bit of time, but I hope you'll agree that the end results are worth it.  I would love to see how your roses turn out.

This is the rose we will be making, let's get started...


Here is what you will need:
Coffee filters
Food colouring or dye (red and yellow)
Floral wire
Floral tape
Scissors
Paint brush

1. Dilute food colouring or dye in water (the richer the colour, the darker the rose).  In order to expedite the process, use a large container where you can place several coffee filters at the same time.
2. Place coffee filter in the coloured water.  The longer you leave the filter in the water, the richer the colour will be.  Continue this process and allow to dry.  If you are like me and don't like waiting, you can use a hair dryer to expedite the process.
3. In a small container, dilute yellow and red food colouring or dye to make orange; this will be used for the centre of the rose (you can skip this step and the next step, however,  I think that this is what makes the rose so realistic looking)
4.With a paint brush, gently add the orange/yellow colour to the edge of the filter.  The filter must be dry or the paint will run and mix with the pink. Once again, allow to dry.


Is this not the most beautiful bunch
of coffee filters you have ever seen?

5. Once the filter is dry, take the filter with the orange edge (not very noticeable in the picture, but you want it to be very gradual) and fold in half.
6. Fold that half in half.
7. Cut the bottom of the filter as shown
8. Open the filter and cut a slit on one side only as shown.

9. Take your floral wire (sorry, I forgot to buy some and so I used a pipe cleaner; it works well but it's not as sturdy as floral wire)
10. Start wrapping the coffee filter around the pipe cleaner
11. Continue wrapping until...
12. The entire filter is wrapped around the wire

13. With floral tape, tightly wrap bottom of rose as shown
14. In a similar way as steps 5 and 6, fold filter to form a triangle (I folded it 4 times)
15. (Optional) With your scissors, scallop the edges.  This does not have to be perfect.; nature is perfectly imperfect.
16. Open filter and repeat steps 9-13.  You will repeat steps 9-13 until you have the desired size. For this particular rose I used 4 filters in total.

17. Once you are satisfied with the size, wrap the filter one last time but this time...
18. Wrap the entire wire

19. It's difficult to tell from the pictures but the last row of  'petals'  looks like one continuous petal.  In order to give the rose a realistic look you will have to cut the filter in the shape of a petal..see fig. 20.
21. I tried to show you with an arrow how the cut would look (I apologize for the quality of the picture)
22. The rose is now done.  Now it's time to fluff it up and make it look real by adjusting the petals.  Use the method I showed you here (steps 6-7). 


.................Take a deep breath.................

And we are done!  As I mentioned before, the initial process of dying the filters takes some time, but once you have all those beautiful filters ready, you should be a master rose maker by your second rose! (fingers crossed for you)


Paper Rose Bouquet

Found on Lia Griffith's blog.
http://liagriffith.com/diy-paper-rose-wedding-bouquet/

DIY Paper Rose Wedding Bouquet

Wedding Bouquet Made From Paper Roses WeddingBouquet6 WeddingBouquet5 DIY Paper Rose Bouquet WeddingBouquet2
What a gorgeous way to add a little personal touch to your wedding. One of the trends for weddings is to create an event that unique and memorable. One way is to add some gorgeous sculptural paper roses into the mix. This version of my paper rose includes three tones of pink, peach and blush. The watercolor print on both sides creates a visual texture adding a painterly touch. If you are not planning a wedding, no problem! This lovely bouquet is a great Mother’s Day gift or a sculptural bouquet to dress your table. Below you will find my tutorial on how to make this bouquet. You can also refer to my paper rose video tutorial. Simply replace the skewer shown in the video with the floral wire steps.
To make this bouquet you will need:
• Prints of the 18 paper rose PDFs & 2 sheets of the leaf PDFs onto letter weight paper
(PLEASE NOTE: The PDFs have 2 pages, one to print on the front and the other on the back of the paper. Also, this double sided printable works best printed on a laser printer)
• Scissors • Hot glue gun • Floral wire • Floral tape • 2 yards of ribbon
You will find the link to download the PDFs below. Note that the preview does not show the complete design, but when you download and open it in Acrobat you will see exactly what you will be printing. Enjoy! ~ Lia
RoseButtonRoseLeaves

Paper Mums

Found on Lia Griffith.
http://liagriffith.com/making-paper-mums-with-plum-purple-and-orange-metallic-papers/


MumBridesmaidBouquet

Today I am going to show you how to make the paper mums that I used for the mixed bouquet in yesterday’s post. These mums are so simple and colorful that you can make several dozen to use throughout the summer and fall for your party decoration, gift toppers or for wedding flowers. In the photo above you can see how beautiful a bridesmaid bouquet can look made from metallic paper mums. Below is an example of a centerpiece using the mums and a simple terra cotta pot. Making a paper flower hair clip or corsage is an easy added touch and these flowers work so well as gift toppers or napkin rings. The sky is the limit. For these blooms I used metallic letter weight paper that I found at paper-papers.com. The colors are, Mandarin, Mars, Bloom, Punch & Violette and the leaf is made from Botanic. There is something about the metallic paper that adds a luxe look to the flowers that I just love so investing an a few packs of your favorite colors could be a great addition to your craft supplies. Just use the template I have provided below for your trim outline then follow my easy step-by-step tutorial and you will have a handful of blooms in no time. Enjoy ~ Lia

Crocheted Nesting Bowls

Found on The Firefly Hook. http://thefireflyhook.wordpress.com/2013/10/01/free-pattern-nesting-bowls/

Two Nesting Bowls

Welcome to The Firefly Hook!
If you love our free patterns, please pin or share using the buttons below.
Favorite or Queue on Ravelry here.
Nesting bowls-07 Sari Silk Nesting Bowls
Yarn: Upcycled Sari Silk
Yarn Weight: Bulky
Hook: 11.5 mm
Gauge: 7 rows and 5 sts = 4” in sc
Skill level: 1 Beginner (first time crocheter)
Necessary Skills: Basic stitches, working in the round

Nesting bowls-04Notes: These bowls are a quick and fun project for beginners to learn how to crochet. Nesting bowls made of sari silk are such a beautiful and practical gift – even seasoned crocheters will love working these up.


Pattern:
Large Bowl (5” x 2.5”)
Row 1: Ch 3, 12 dc in 3rd ch from hook, sl st in 2nd ch made.

Row 2: [Sc in next st, 2 sc in next st] around (20 sc).

Rows 3-7: Sc in ea st (20 sc).

To finish: Sl st in next st and finish off
.
.
Nesting bowls-05
.
Medium Bowl (4” x 2”)
Row 1: Ch 3, 12 dc in 3rd ch from hook, sl st in 2nd ch made.
Rows 2-5: Sc in ea st (13 sc).
To finish: Sl st in next st and finish off.
.
.
nesting bowls-13 nesting bowls-09For embroidery and bow tutorial, click here.
If you’ve never learned to crochet but have always wanted to give it a try, now is the time! Follow our blog so you don’t miss out on weekly tutorials, patterns, and tips.
Check out our Tubular Crochet series, it’s the perfect starting point for any crocheter.
Nesting bowls-06The pattern for four bowl sizes (XL, L, M, S) is available for $4.99 in our Etsy Ravelry and Craftsy shops.