Thursday, December 21, 2017

Greek Lemon Chicken Soup


I looked at many recipes and this is the combination of versions I like.

  • oil
  • onion/carrots/celery
  • chicken
  • chicken broth
  • lemon juice
  • zested lemon
  • pasta/rice/quinia
  • egg
  • kale/spinach
  • salt/pepper

Saute onion/carrots/celery in oil.  
Add cooked chicken or cook chicken.
Add broth, lemon juice and zested lemon. Large pot 8-12c = 1/2c lemon juice
Bring to boil and add pasta.  Cook till pasta is done.
When pasta is cooked to al denta, temper in a few eggs.
Add kale/spinach
Season to taste with salt and pepper.

Thursday, November 23, 2017

Tortilla Chips

Found at https://www.bakedbyrachel.com/seasoned-baked-tortilla-strips/

Seasoned Baked Tortilla Strips

Crunchy homemade seasoned and baked tortilla strips. A perfect topping for salads, soups and more!

Ingredients:

  • 8 small corn tortillas
  • 4 tsp vegetable oil
  • 1 tsp chili powder
  • 1/4 tsp onion powder
  • 1/4 tsp garlic powder
  • 1/4 tsp salt
  • 1/4 tsp ground black pepper

Directions:

  1. Preheat oven to 375°F.
  2. Line a baking sheet with a silicone baking mat or parchment paper.
  3. Cut corn tortillas into 1/2-inch strips. Add to a large bowl, toss with vegetable oil to coat. Sprinkle with seasonings. Toss to coat tortilla strips evenly.
  4. Transfer to prepared baking sheet. Bake for 5-10 minutes. Toss and return to the oven. Continue baking for an additional 5-10 minutes or until desired crispness is reached.
  5. Cool completely before storing in an airtight container.

Tuesday, October 17, 2017

Gypsy Blue Jacket


Found via FB on Crochet Addiction group.

Listed in ravelry as a pattern.

Link to https://www.garnstudio.com/pattern.php?id=7154&cid=17

Putting pattern in my blog because it never fails when I go to look for the pattern it won't be online anymore.

This pattern is written in American English. All measurements in charts are in cm.

DECREASE TIP:
2 tr tog into 1 tr as follows: Work 1 tr but wait with last YO and pull through, work 1 tr in next st but pull last YO through all 3 sts on hook.

CROCHET TIP:
Replace first tr on round with 4 ch. Finish with 1 sl st in fourth ch from beg of round.
----------------------------------------------------------

CIRCLE:
When piece is worked in the round, start with this technique to avoid hole in the middle (instead of ch-ring) use Big Delight: Hold the yarn end and wind the yarn one time around the index finger to make a loop. Hold the loop with left thumb and middle finger, place the yarn over left index finger. Insert hook through the loop, make a YO and pull yarn through loop, work ch 1, then work around the loop as follows: 
ROUND 1: ch 1, 1 sc, 2 hdc, 2 dc, 2 tr. Insert 1 stitch marker in loop on last tr so that it does not unravel and place yarn aside. Switch to Karisma and work as follows in loop: 1 sc, 2 hdc, 2 dc, 2 tr. Pull the yarn end to tighten loop. Fasten the yarn end on the back side.

ROUND 2: (Continue with Karisma). Work 1 tr + 1 ch in each of the first 7 sts (= 1 sc, 2 hdc, 2 dc and 2 tr worked with Big Delight). Insert 1 stitch marker in loop on last tr so that it does not unravel and place yarn aside. Continue with Big Delight. Work 1 tr + 1 ch in each of the next 7 sts (= 1 sc, 2 hdc, 2 dc and 2 tr worked with Karisma) = 14 tr + 14 ch.
ROUND 3: (Continue with Big Delight.) Work 1 tr + 1 ch + 1 tr + 1 ch in each of the first 7 tr, insert 1 stitch marker in loop on last tr so that it does not unravel and put yarn aside. Continue with Karisma, work 1 tr + 1 ch + 1 tr + 1 ch in each of the next 7 tr = 28 tr + 28 ch.
ROUND 4: (Continue with Karisma). * Work 1 tr + 1 ch in the next tr, work 1 tr + 1 ch + 1 tr + 1 ch in the next tr *, repeat from *-* 7 times. Insert 1 stitch marker in loop on last tr so that it does not unravel and place yarn aside. Continue with Big Delight. * Work 1 tr + 1 ch in the next tr, work 1 tr + 1 ch + 1 tr + 1 ch in the next tr *, repeat from *-* 7 times = 42 tr + 42 ch.
ROUND 5: (Continue with Big Delight.) * Work 1 tr + 1 ch in each of the next 2 tr, work 1 tr + 1 ch + 1 tr + 1 ch in the next tr *, repeat from *-* 7 times. Insert 1 stitch marker in loop on last tr so that it does not unravel and place yarn aside. Continue with Karisma. * Work 1 tr + 1 ch in each of the next 2 tr, work 1 tr + 1 ch + 1 tr + 1 ch in the next tr *, repeat from *-* 7 times = 56 tr + 56 ch.

Repeat 4th and 5th round but on every round work 1 tr + 1 ch more between every inc = 14 tr + 14 ch inc on every round. Continue until there are 112-112-126-126-140-140 tr + 112-112-126-126-140-140 ch on round, circle measures approx. 20-20-23-23-25-25 cm / 8"-8"-9"-9"-9 3/4"-9 3/4" from middle (= 40-40-46-46-50-50 cm / 15 3/4"-15 3/4"-18"-18"-19 3/4"-19 3/4" in diameter).

Work next round as follows: (Continue with spiral and color change but without inc.) Work 1 tr + 1 ch in each of the first 16-16-18-18-20-20 tr, work 24-24-28-28-32-32 loose ch for armhole, skip the next 16-16-18-18-20-20 tr, work 1 tr + 1 ch in every tr until 32-32-36-36-40-40 tr remain on round, work 24-24-28-28-32-32 loose ch for armhole, skip the next 16-16-18-18-20-20 tr, work 1 tr + 1 ch in each of the last 16-16-18-18-20-20 tr. 

Work next round as follows: 
* Work 1 tr + 1 ch in each of the next 7-7-8-8-9-9 tr, work 1 tr + 1 ch + 1 tr + 1 ch in next tr *, repeat from *-* 2 times, work 18-18-20-20-22-22 tr with 1 ch between each around ch-space, * work 1 tr + 1 ch in each of the next 7-7-8-8-9-9 tr, work 1 tr + 1 ch + 1 tr + 1 ch in next tr *, repeat from *-* 3 times. Insert 1 stitch marker in loop on last tr so that it does not unravel and place yarn aside. Switch yarn. * Work 1 tr + 1 ch in each of the next 7-7-8-8-9-9 tr, work 1 tr + 1 ch + 1 tr + 1 ch in next tr *, repeat from *-* 3 times, work 18-18-20-20-22-22 tr with 1 ch between each around ch-space, * work 1 tr + 1 ch in each of the next 7-7-8-8-9-9 tr, work 1 tr + 1 ch + 1 tr + 1 ch in next tr *, repeat from *-* 2 times = 126-126-140-140-154-154 tr + ch on round.

Work as 4th and 5th round but on every round work 1 tr + 1 ch more between every inc = 14 tr + 14 ch inc on every round. Continue until circle measures 52-54-56-58-60-62 cm / 20½''-21¼''-22''-22¾''-23 5/8''-24 3/8'' from middle (= 104-108-112-116-120-124 cm / 41"-42½"-44"-45 3/4"-47 1/4"-48 3/4" in diameter, or desired measurements).

Finish circle as follows: Continue with the same yarn as last round. Work 1 tr in each of the next 2 tr, 1 dc in each of the next 2 tr, 1 hdc in each of the next 2 tr, 1 sc in next tr, 1 sl st in next tr, fasten off. Work the same way in the other side.

SLEEVES:
Work in the round from armhole and down. Use hook size 6 mm / J/10 and beg with opposite color of the one the last tr around armholes was worked with. Work stripes, i.e. work 1 round with Karisma and 1 round with Big Delight - READ CROCHET TIP. 

Work 36-38-40-42-44-46 tr around the opening for sleeve, beg of round should be under sleeve. Then work 3 rounds with 1 tr in every tr. Continue with 1 tr in every tr - AT THE SAME TIME dec 2 tr mid under sleeve - READ DECREASE TIP. Repeat dec every 8 cm / 3 1/8'' 6 more times = 22-24-26-28-30-32 tr. Continue to work until sleeve measures 54-55-54-55-54-55 cm / 21 1/4"-21½"-21 1/4"-21½"-21 1/4"-21½". Fasten off. Work the other sleeve the same way.

Diagram


Wednesday, October 11, 2017

Itsy Bitsy Spiderweb Baby Blanket

Itsy Bitsy Spiderweb 
From Leisure Arts "Our Best Baby Afghans" (in filing cabinet)

Finished Size: ~34" x 46'

Materials:
- sport weight yarn ~13oz 1255 yards
- hook, size H

Gauge: 16dc and 10 rows = 4"

Ch137 loosely.

Row 1 Dc in fourth ch from hook and in each ch across 135 sts.

Row 2 (Right side) Ch3 (counts as first dc, now and throughout), turn ; dc in next 2 dc, * ch1, skip next dc, dc in next 15 dc* to last 4 dc, ch1, skip next dc, dc in last 3 dc.
Note Loop a short piece of yarn around any stitch to mark last row as right side.

Row 3,14,25,36,47,58,69,80,91,102 Ch3, turn; dc in next 2 dc, ch1, *dc in next dc, (ch1, skip next dc, dc in next dc) 7 times, ch1* across to last 3 dc, dc in last 3 dc.

Row 4,15,26,37,48,59,70,81,92,103 Ch3, turn; dc in next 2 dc, ch1, *dc in next dc, (dc in next ch-1 sp and in next dc) 7 times, ch1* across to last 3 dc, dc in last 3 dc.

Row 5,16,27,38,49,60,71,82,93,104 Ch3, turn; dc in next 2 dc, ch1, *dc in next 15 dc, ch1* across to last 3 dc, dc in last 3 dc

Row 6,17,28,39,50,61,72,83,94,105 Ch3, turn; dc in next 2 dc, ch1, *dc in next 3 dc, ch3, (skip next dc, tr in next dc) 4 times, ch3, skip next dc, dc in next 3 dc, ch1* across to last 3 dc, dc in last 3 dc.

Row 7,18,29,40,51,62,73,84,95,106 Ch3, turn; dc in next 2 dc, ch1, *dc in next 3 dc, ch3, sc in next 4 tr, ch3, dc in next 3 dc, ch1* across to last 3 dc, dc in last 3 dc.

Rows 8-10,19-21,30-32,41-43,52-54,63-65,74-76,85-87,96-98,107-109 Ch3, turn; dc in next 2 dc, ch1. *dc in next 3 dc, ch3, sc in next 4 sc ch3, dc in next 3 dc, ch1* across to last 3 dc, dc in last 3 dc.

Row 11,22,33,44,55,66,77,88,99,110 Ch3, turn; dc in next 2 dc, ch1, * dc in next 3 dc, ch1, (tr in next sc, ch1) 4 times, dc in next 3 dc, ch1* across to last 3 dc, dc in last 3 dc.

Row 12,23,34,45,56,67,78,89,100,111 Ch3, turn; dc in next 2 dc. ch1. * dc in next 3 dc and in next ch-1 sp, (dc in next tr and ch-1 sp) 4 times, dc in next 3 dc, ch1* across to last 3 dc, dc in last 3 dc.

Row 13,24,35,46,57,68,79,90,101,112 Ch3, turn; dc in next 2 dc, ch1, *dc in next 15 dc, ch1* across to last 3 dc, dc in last 3 dc

Rows 14-114 Repeat Rows 3-13, 9 times; then repeat Rows 3 and 4 once more.
Row 115 Ch3, turn; dc in next dc and in each dc and ch-1 sp across, do not finish off.

EDGING
Rnd l Ch1, turn; work 136 sc evenly spaced across; working in end of rows, 3 sc in first row, work 173 sc evenly spaced across to last row, 3 sc in last row working in free loops of beginning ch (Fig, 23b, page 125), work 136 sc, evenly spaced across working in end of rows, 3 sc in first row, work 173 sc evenly spaced across to last row, 3 sc in last row join with slip st to first sc 630 sc.

Rnd 2 Ch1, *sc in next sc, ch4, sc in third ch
from hook, ch2, skip next 2 sc*around; join with slip st to first sc, finish off.


Tuesday, August 1, 2017

Enchilada Sauce

Found this somewhere...

Remember combine all dry ingredients in sauce pan first!!!!

3T chili powder (2.5t cumin & garlic powder, 1.25t paprika & oregano, 1t cayenne)
3T flour
2t cumin
1t cocoa powder
1t oregano
1/2t onion powder
1/2t garlic powder
1/2t salt
Combine all dry in a pan

2c water
Slowly add enough water to make a thin paste, then add remaining water

Cook over medium heat, stirring constantly until thickens.

8oz can tomato sauce
Stir in tomato sauce

Wednesday, July 19, 2017

Angel food cake


Total Time: Prep: 15 min. Bake: 35 min. + cooling 

Ingredients

  • 1-1/4 cups egg whites (about 9)
  • 1-1/2 cups sugar, divided
  • 1 cup cake flour (1c ap flour minus 2T plus 2T cornstarch)
  • 1-1/4 teaspoons cream of tartar
  • 1 teaspoon vanilla extract
  • 1/4 teaspoon almond extract
  • 1/4 teaspoon salt

Directions

  1. Place egg whites in a large bowl; let stand at room temperature 30 minutes. Sift 1/2 cup sugar and flour together twice; set aside. 
  2. Place oven rack in the lowest position. Preheat oven to 350°. Add cream of tartar, extracts and salt to egg whites; beat on medium speed until soft peaks form. Gradually add remaining sugar, about 2 tablespoons at a time, beating on high until stiff peaks form. Gradually fold in flour mixture, about 1/2 cup at a time.
  3. Gently spoon into an ungreased 10-in. tube pan. Cut through batter with a knife to remove air pockets. Bake 35-40 minutes or until lightly browned and entire top appears dry. Immediately invert pan; cool completely, about 1 hour. 
  4. Run a knife around side and center tube of pan. Remove cake to a serving plate. Yield: 12-16 servings. 
Originally published as Angel Food Cake in Down the Aisle Country-Style 2000, p52 

Nutritional Facts

1 slice: 115 calories, 0 fat (0 saturated fat), 0 cholesterol, 68mg sodium, 26g carbohydrate (19g sugars, 0 fiber), 3g protein.

Tuesday, May 23, 2017

Yarn Over TShirt Rug


I found this on https://moralefiber.blog/2016/04/03/2298/


Yarn Over T-Shirt Rug Tutorial


Here’s another project that fits firmly into the “tired of staring at it because it’s been sitting on my desk for over a year so I might as well finish it” category!
StonesonSand2
There’s no real reason that it took me so long to finish, other than I got continuously distracted by other projects and lost my momentum on it. It was the fourth crocheted t-shirt rug from this series that I posted a while ago, in which I allude to the method but don’t provide much of an explanation. Today I am remedying that!
But FIRST! Here’s how to make T-shirt yarn via Endlessly Inspired.
I got the idea of using yarn to crochet around the t-shirt strips from Pinterest (of course) but felt that I could make things a little more interesting by experimenting with stitch designs..
MerryPrankster2
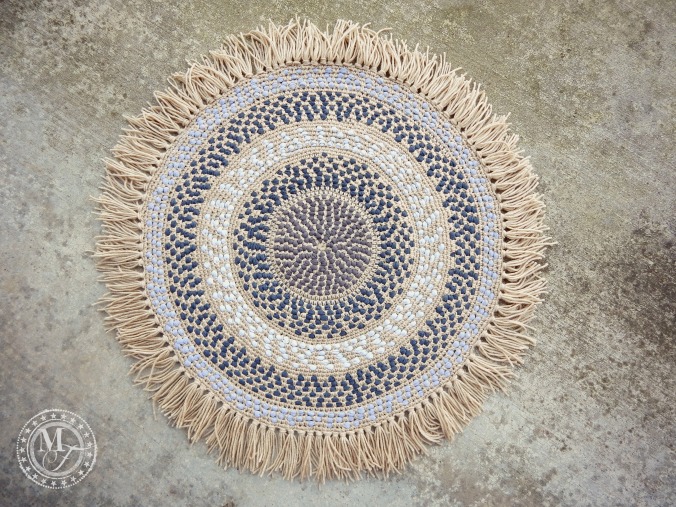
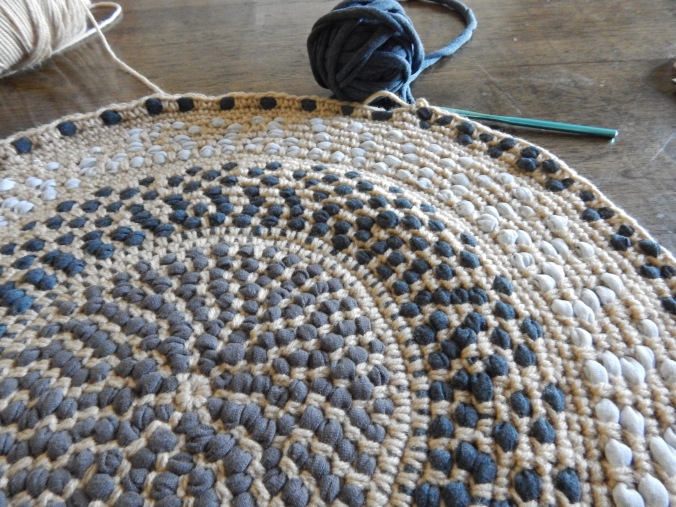
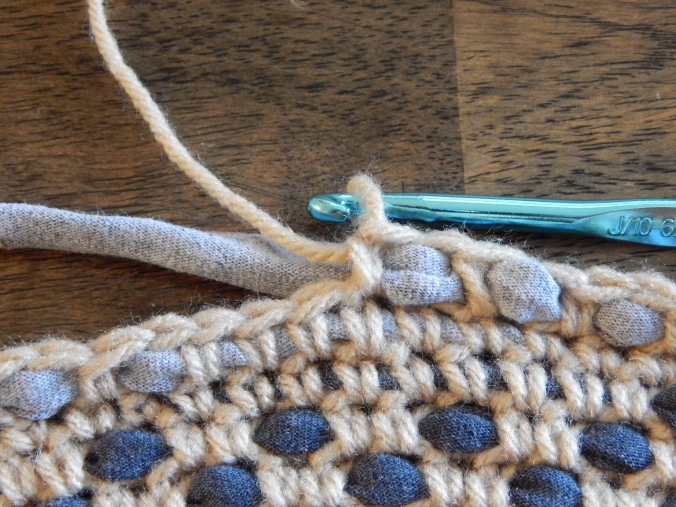
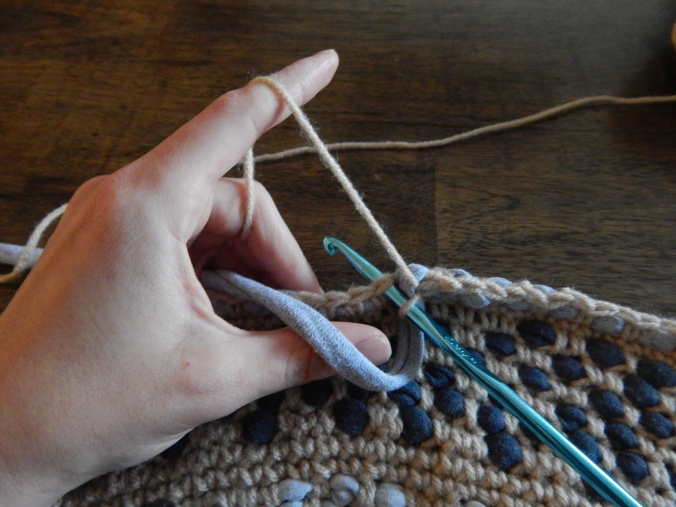
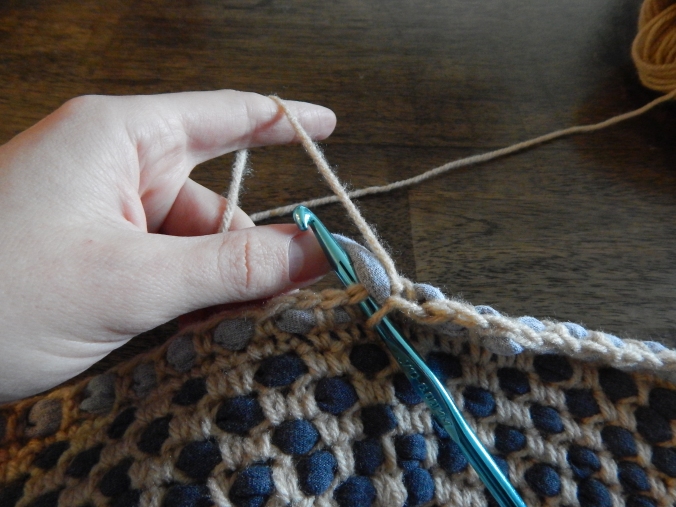
…. which was fun, but sometimes one desires a more mindless exercise. So I experimented with ducking the t-shirt yarn strip in front of and behind the stitch, and came up with a design that makes the strip form  eye-pleasing rings of bobbles or nubs, or in the case of my most recent rug, stones on sand.
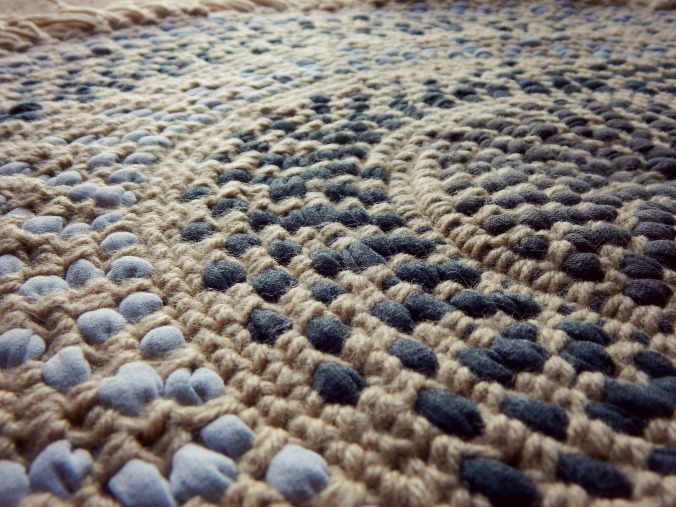
StonesonSand5
Crocheting around the T-shirt yarn in this way is soooooo much easier, neater-looking, and more economical  than trying the crochet the t-shirt yarn itself. I always make my own t-shirt yarn, so it’s also better because it’s easy to switch from one ball to another with this method. So enough talk… how is it done?
Crocheted T-shirt Rug How-To
DSCN4267
You need:
A large amount of cotton or acrylic yarn (A skein of Caron One Pound usually gets the job done nicely, with some to spare)
T-shirt Yarn (I use home-made, but store bought works too!)
A 6.00 mm hook
Start by making a magic ring. 6 sc into the ring tightly. Sc into the first sc of the first round to begin a joinless, in-the-round crochet circle. *
*I will not be giving instructions for increases in the round because I’m making the assumption that the crocheter already knows how to handle this – just work them in the same proportion as you usually would or decide how many you need to keep it flat as you go. 
In the second round of stitching, hold the t-shirt yarn flat against the last row and start to stitch the single crochet over the tail of this yarn until you have worked 3-5 stitches or have anchored it securely. Once you have secured the t-shirt yarn, you will begin weaving it in and out of the sc stitches.
DSCN4483
This isn’t a picture of the second round, but you can see where I have begun the new strip by anchoring it within the sc stitching before I start weaving it in and out.
Continuing to work in the round (and adding increases where necessary), hold the t-shirt yarn to the back of your work and work a sc in the next stitch. Keep in mind that the t-shirt yarn should be completely to the back of the work so that the yarn is not held within the stitch at all.
*Tightening the sc after working it by holding the loop steady and pulling on your working yarn makes the rug nice and firm and helps the t-shirt yarn bobbles look neat.
Before you work the next stitch, bring the t-shirt yarn completely to the front of the work, so that you are working your next sc behind the t-shirt strand.
DSCN4490
Work the next sc, tighten it down if necessary, then return the t-shirt strand to the back of the work – this will wrap the t-shirt yarn around the stitch you just made, creating a little t-shirt bobble.
With the t-shirt yarn at the back, make another sc in the next stitch.
DSCN4493
Continue alternating holding the t-shirt yarn in front or back, until you get near the end of the strand or decide to change colors. Return the t-shirt yarn to the top of your work and work a series of several sc stitches OVER the yarn, so that it is trapped in the stitch again. Do this until the end is reached, then begin the next strand the same way.
I like to vary the proportion of bobbles in the front (i.e – bring the t-shirt yarn to the front every two stitches, every three stitches, etc) to provide visual interest, or alternate rounds of bobbles with rounds of t-shirt yarn carried along inside openwork stitches.
DSCN1349
T-shirt yarn carried inside openwork stitches (granny blocks in this case)
As I’ve mentioned before, carrying T-shirt yarn along while you crochet regular yarn is a lot easier on your hands than trying to crochet the t-shirt yarn itself!  And this way, there’s tons of variations you can try.
My rugs usually end up being somewhere between 32-45″, for use as small accent rugs or even table centerpieces (and if you use all cotton materials, really awesome hotpads are possible!)

Thursday, March 23, 2017

Low Carb Gnocchi

I found this on http://foodcount.com/recipe/homemade-garlic-gnocchi

But it is really located at https://theprimitivepalate.com/2015/01/25/keto-garlic-gnocchi/

Keto Garlic Gnocchi

  • Servings: 2
  • Time: 25 minutes
  • Difficulty: moderate
  • Print
Ingredients
  • 2 cups shredded Mozzarella (Low-Moisture Part-Skim this is a MUST–otherwise it will fall apart when boiled! I find Kraft to work the best!)
  • 3 egg yolks
  • 1 tsp granulated garlic
  • butter & olive oil for sauteing
Method:
  1. Place cheese and garlic in a microwave safe bowl and toss around to combine. Melt cheese in microwave for about 1 to 1 1/2 minutes.
  2. Fold in one egg yolk at a time until a homogeneous dough forms. This actually takes a little elbow grease!
  3. Portion dough into 4 balls.
  4. Chill in refrigerator for at least 10 minutes.
  5. Lightly grease a silpat or parchment (and your hands-it helps from sticking!) and roll out each ball into a 14-15″ log.
  6. Slice each log into 1″ pieces. (If you like, you can press the tip of a fork onto each piece to get that “gnocchi” look but it’s not necessary)
  7. In a large pot, bring about a half gallon of salted water to a boil (like you would for normal pasta). Place all the gnocchi into the pot and cook until they float, about 2-3 minutes. The strain into a colander. (*note: a few of my readers say that have skipped this step and the gnocchi still turns out great!)
  8. Heat a large non-stick pan on medium-high heat. Add a tablespoon of butter and a tablespoon of oil to pan.
  9. Add gnocchi and saute each side for about 1-2 minutes, until golden brown.
  10. Season with salt and pepper and serve!
It’s a seriously rare occasion that I crave pasta. I know, I’m soooo lucky. I should rephrase that, I rarely crave boxed pasta. Handmade pasta is a different story, and gnocchi has always been my favorite. They are like soft little pillows that melt in your mouth…when cooked correctly of course!
Recently, I came up with a recipe for Everything Bagel Dogs and the dough was such a hit! So I’ve been tinkering around with it and came up with this recipe! I was astounded that this dough is able to be boiled and then panfried!
DSC_0812DSC_0817DSC_0822Making this recipe is surprisingly much easier than real gnocchi! Technically all you need are 2 ingredients: shredded mozzarella and egg yolks! I add a little garlic powder to give them a bit more flavor. Normally, when you are boiling gnocchi you have to take them out as soon as they float, or they get extra gummy and not very yummy.
Luckily, these are a different story. I actually let them float around in the boiling water for an extra 5 minutes and they were still soft little pillows.
With only 4 net carbs per serving (a 1 cup serving of traditional potato gnocchi is about 40 carbs) this recipe is a great alternative to pasta! I served mine with roasted wild mushrooms, arugula and panfried pork chops. I’d love to hear what everyone else comes up with!
DSC_0793DSC_0794DSC_0796DSC_0797DSC_0800DSC_0801DSC_0804