I’ve been wanting to make a faux-hawk beanie for Baby Boy since last year. He would have looked pretty cute as a baby wearing one, BUT I got a little sidetracked with all the other hats I made him. It’s Fall now and starting to cool off so it’s perfect timing!
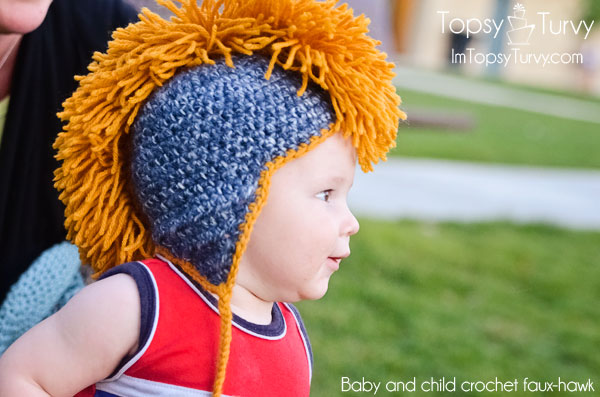
He’s not the biggest fan of hats, sadly… He keeps pulling it off, but I’m hoping when it gets colder he’ll leave it on (yeah right). But that’s okay, cause I’ve written a few other sizes for you, baby, child and adult (teen’s too).


I used two different yarns for this one, The Jiffy is great and has lots of texture/color variation and I used it for the beanie, the wool-ease in orange was a great contrast to the blue! I made my mohawk a bit differnt from others I’ve seen, mine is SUPER full, and FLUFFY… I adore it!


Ear flap beanie materials:
Hook: I/5.50mm
Yarn: Lion Brand Jiffy mine is Blue
Yarn: Lion Brand wool ease mine is Orange
abbreviation:
ch (chain)
sl st (slip stitch)
hdc (half double crochet)
hdc2tog (half double crochet 2 stitches together)
Beanie
Adult (child, baby)
Start with a magic ring
Rnd 1 – Ch 2, 8hdc around, join. (8)
Rnd 2 – Ch 2, 2hdc into each st around, join. (16)
Rnd 3 – Ch 2, *hdc in next, 2hdc in next* around, join (24)
Rnd 4 – Ch 2, *hdc in next 2, 2hdc in next* around, join. (32)
Rnd 5 – Ch 2, *hdc in next 3, 2hdc in next* around, join. (40)
Rnd 6 – Ch 2, *hdc in next 4, 2hdc in next* around, join. (48)
Rnd 7 – Ch 2, *hdc in next 5 (5, 11), 2hdc in next* around, join (56, 56, 52)
Rnd 8 – Ch 2, *hdc in next 6 (13, 52- no double for the baby size), 2hdc in next* around, join (64, 60, 52)
Rnds 9- 20 (18, 15) – Ch 2, hdc in each st around, join. (64, 60, 52)
Earflaps
(adult version) row 1.a – Ch 2, hdc in next 16
(adult version) row 1.b – Ch 2 and turn, hdc2tog, hdc 12 times, hdc2tog. (14)
(kid and baby)Row 1 – Ch 2, hdc in next 14
Row 2 – Ch 2 and turn, hdc2tog, hdc 10 times, hdc2tog. (12)
Row 3 – Ch 2 and turn, hdc2tog, hdc 8 times, hdc2tog. (10)
Row 4 – Ch 2 and turn, hdc2tog, hdc 6 times, hdc2tog. (8)
Row 5 – Ch 2 and turn, hdc2tog, hdc 4 times, hdc2tog. (6)
Row 6 – Ch 2 and turn, hdc2tog, hdc 2 times, hdc2tog. (4)
Row 7 – Ch 2 and turn, hdc2tog twice. (2)
Fasten off and weave in ends
The space across forehead should be around 27 (24, 20) st’s wide, make that choice after trying the beanie on your model!
Edging
Change yarn color
sl st in the back, ch 1, sc around, sl st to the first sc
Cut 6 long strips for each ear flap, slip it in between the 2 hdc2tog in row 7 of the ear flaps, and braid the long strips!

Faux-Hawk Strip
Small (Medium, Large)
materials:
Hook: I/5.50mm
Yarn: Lion Brand wool ease
abbreviation:
ch (chain)
sc (single crochet)

Strip
ch 41 (47, 51).
Row 1: Sc in 2nd ch from hook and in each remaining ch across, turn—40 (46, 50) sc.
Rows 2 and 3: Ch 1, sc in each sc across, turn.
Fasten off.
Honestly you could easily make this any length, just chain until your happy with the length front to back of the beanie.

Fringe
Cut approximately 600 (690, 750) 6-7 inches long. Holding 5 pieces together, fold the strands in half. Insert crochet hook, from RS to WS to RS again, around a stitch of the center row of Mohawk strip and into the folded strands. Draw the fold back around the stitch to the RS, forming a loop on the RS. Insert ends of strands into the loop and pull to tighten. Repeat this process to attach fringe to all of the sc in each row of Faux-hawk strip. Trim fringe to about 2-2 1/2 inches long.

Once you’ve tied all the fringe on take a long piece of yarn and a needle and sew your faux-hawk strip onto the beanie!! I sewed down the center first then down each side to get it nice and snug!
No comments:
Post a Comment